Quantcast
Channel: Kamran Agayev's Oracle Blog
Viewing all 60 articles
Browse latest View live

Create a clone database in Oracle Cloud

$
0
0

In this step by step tutorial, we will create a clone database for the development or testing purposes. Using Oracle Database Cloud service you don’t need to configure and run DUPLICATE command of RMAN and create a clone of production database for developers team. All you need is to create a snapshot of your production database and clone it in a few minutes.

So first of all, let’s create a new database. Open cloud.oracle.com, login with your credentials and create a new database service. Please check my previous blog posts to create a new database service:

kamranagayev.com/2016/12/05/step-by-step-guide-to-create-an-oracle-database-in-the-cloud/

kamranagayev.com/2016/12/06/step-by-step-guide-create-a-primary-and-standby-database-in-the-cloud/ 


After successully creating a new database open it and select Aimage-8dministration section


Before creating a snapshot of the database, login to the database and create a new table, insert one row and commit the transaction. We will check this table after cloning the snapshot

image-9


Next, switch to the Snapshots tab, click “Create Storage Snapshot” button and provide the name of the snapshot. Don’t click Create button

image-10


When the snapshot of the database is taken, the database is placed into the backup mode. To test it, open SQL connection, click on Create button to create a snapshot and switch to the SQL session and run a command. The session will hang

image-11


image-12


When the snapshot is created, click on the menu icon on the right and choose Create Database Clone to create a clone database from the snapshot

image-13


Next, provide the service name and the database name for the clone database and create it

image-14


After few minutes the clone database wilimage-15l be created


Now login to the clone database and check the table that was created before

image-16


The first table was created before the snapshot and thus it’s there. But the second table was create after creating a snapshot and is not available.

As you see, it’s very easy to create a clone database using snapshots in Oracle Cloud. By having a trial account you are provided 500Gb of free space. Each database service consumes 150Gb space, so having 1 production db (150Gb), 1 snapshot (150Gb) and 1 clone database (150Gb) you can easily test the clone database creation with your trial account


Configure and practice backup and recovery for Oracle Database in Cloud (DBaaS)

$
0
0

In this post I will show you how to configure backup for Oracle Database in Cloud. First of all, make sure you use Oracle Storage Cloud Service and you set the replication policy. Open the following link, scroll down to Oracle Storage Cloud Service section and click “Set Replication Policy” link:

https://myservices.em2.oraclecloud.com/mycloud/faces/dashboard.jspx?showOld=true


image-1


Select the data center and click Set


image-2


Next, open Oracle Database Cloud Service and create a new service. The GUI has changed and we have only 3 steps to create a database in the cloud. Provide the service name, software version and edition, upload SSH public key and click Next


image-3


In order to enable the automatic backup of the database in the cloud, you have to create a cloud storage container. Before creating a cloud storage container, switch to Oracle Storage Cloud Service details and get the REST Endpoint:


image-18


Next, open https://storageconsole.em2.oraclecloud.com/ link, provide the Service REST Endpoint and login to Oracle Storage Cloud Service:


image-19


Create a new storage container:


image-4


image-6


In the second screen of database service creation page, select “Both Cloud Storage and Local Storage” option as a Backup Destination, provide cloud storage container name, username and password and click Next.


image-5


Review the configuration and click Create button.


image-7


After creating the service successfully, open it and click on Administration section. From the Backup tab click on Backup Now button to create a backup of the database. You can use RMAN and schedule your own backups as well.


image-8


Click Backup Now and check the log file for more information:

image-9


If you switch to the storage container, you will see bunch of files created


image-10


Open RMAN and run LIST BACKUPSET SUMMARY command to get list of backupsets:
image-11


Now let’s try to recover the database to the specific point in time using DBaaS wizard. For this, create a new table with some data, get the current SCN number and drop the table.


image-12


Next, switch to DBaaS backup page, click Recover, provide the SCN number and click Recover


image-13


The recover process will run in the background automatically. Check alert.log file of the database for more information:


image-14


After the recover process is completed successfully login to the database and query the table

image-15


You can also take backup and recover the database from command line interface using bkup_api utility. Now let’s delete all backups, take a new backup and try the recovery.

Delete all available RMAN backups:

RMAN> delete backup;


Use bkup_api utility with bkup_start parameter to take a backup from CLI:

[root@srvtest spool]# /var/opt/oracle/bkup_api/bkup_api bkup_start

DBaaS Backup API V1.5 @2016 Multi-Oracle home

DBaaS Backup API V1.5 @2015 Multi-Oracle home

-> Action : bkup_start

-> logfile: /var/opt/oracle/bkup_api/log/bkup_api.log

UUID d6bf0bde-c130-11e6-8534-c6b0e87f74cb for this backup

** process started with PID: 16524

** see log file for monitor progress

————————————-

[root@srvtest spool]#


Check the log file for more information:

[root@srvtest spool]# tail -f /var/opt/oracle/bkup_api/log/bkup_api.log

Tue, 13 Dec 2016 12:36:58 ** process started with PID: 16524

Tue, 13 Dec 2016 12:36:58 ** see log file for monitor progress

Tue, 13 Dec 2016 12:36:58 ————————————-

Tue, 13 Dec 2016 12:36:58 d6bf0bde-c130-11e6-8534-c6b0e87f74cb Checking if TESTDB resource is available

Tue, 13 Dec 2016 12:36:58 d6bf0bde-c130-11e6-8534-c6b0e87f74cb has a lock TESTDB

Tue, 13 Dec 2016 12:36:58 UUID d6bf0bde-c130-11e6-8534-c6b0e87f74cb written with PID 16524

Tue, 13 Dec 2016 12:36:58 d6bf0bde-c130-11e6-8534-c6b0e87f74cb The process is no longer running removing

lock

Tue, 13 Dec 2016 12:36:58 d6bf0bde-c130-11e6-8534-c6b0e87f74cb registering request into the database

Tue, 13 Dec 2016 12:37:00 d6bf0bde-c130-11e6-8534-c6b0e87f74cb current backups 0

Tue, 13 Dec 2016 12:37:00 d6bf0bde-c130-11e6-8534-c6b0e87f74cb command /home/oracle/bkup/TESTDB/obkup -dbname=TESTDB


Tue, 13 Dec 2016 12:38:51 d6bf0bde-c130-11e6-8534-c6b0e87f74cb@ backups after execution 4

Tue, 13 Dec 2016 12:38:51 d6bf0bde-c130-11e6-8534-c6b0e87f74cb rman tag TAG20161213T123750

Tue, 13 Dec 2016 12:38:51 d6bf0bde-c130-11e6-8534-c6b0e87f74cb rman tag TAG20161213T123729

Tue, 13 Dec 2016 12:38:51 d6bf0bde-c130-11e6-8534-c6b0e87f74cb rman tag TAG20161213T123758

Tue, 13 Dec 2016 12:38:51 d6bf0bde-c130-11e6-8534-c6b0e87f74cb rman tag TAG20161213T123834

Tue, 13 Dec 2016 12:38:51 d6bf0bde-c130-11e6-8534-c6b0e87f74cb Backup succeded TAG20161213T123834


Now having valid backups, let’s create a new table, drop it and recover it using dbaascli utility.


[oracle@srvtest opc]$ sqlplus / as sysdba

SQL> create table mytable2 as select * from dba_objects;

Table created.


SQL> select count(1) from mytable2;

  COUNT(1)

———-

     88911


SQL> select current_scn from v$database;

CURRENT_SCN

———–

    1333654


SQL> drop table mytable2 purge;

Table dropped.


SQL> exit


Now use dbaascli utility and provide the SCN number to perform SCN based incomplete recovery:

[root@srvtest opc]# dbaascli orec –args -scn 1333654

DBAAS CLI version 1.0.0

Executing command orec –args -scn 1333654

–args : -scn 1333654


OREC version: 16.0.0.0


Starting OREC

Logfile is /var/opt/oracle/log/TESTDB/orec/orec_2016-12-13_13:41:18.log

Config file is /var/opt/oracle/orec/orec.cfg


DB name: TESTDB

OREC:: RUNNING IN NON DATAGUARD ENVIRONMENT

OREC:: Verifying scn validity…

PITR using SCN: 1333654

OREC:: Catalog mode:  Disabled

OREC:: Checking prerequirements before recovery process.

OREC:: DB Status : OPEN

OREC:: Changing instance to MOUNT stage.

OREC:: Shutting down the database… Completed.

OREC:: (RMAN) Startup MOUNT… Completed.

OREC:: Checking for PDBs directories.

OREC:: Checking for REDO logs.

OREC:: Restablishing DB instance to the original stage.

OREC:: Shutting down the database… Completed.

OREC:: Starting up database… Completed.

OREC:: Testing RMAN connection.

OREC:: Verifying backups dates ..

    :: OK

OREC:: Performing PITR using SCN number 1333654 …

INFO : DB instance is up and running after recovery procedure.

OREC:: Completed.


[root@srvtest opc]#


Now connect to the database and check if the table is recovered:

[oracle@srvtest opc]$ sqlplus / as sysdba

SQL> select count(1) from mytable2;

  COUNT(1)

———-

     88911


SQL>


The database backups are also stored in the flash recovery area image-16in the database host:


If you want to change the automatic backup schedule, edit /etc/crontab file with a root user. Below you can see the current schedule of the database backup:

image-17


You can use a DBaaS backup wizard, DBaaS command line interface commands and RMAN to perform backup and recovery for Oracle Database in Cloud

Create a Standby database in Oracle Cloud for On-Premises production database

$
0
0

If you have a production database and you plan to build a standby database on the different geographic location, Oracle Cloud is the best option. In this blog post you will see a step by step guide on how to create a Standby Database in Oracle Cloud for your on-premises database.

Before reading this blog post, check my previous articles to become a familiar with Oracle Cloud:

Configure and practice backup and recovery for Oracle Database in Cloud (DBaaS)

http://kamranagayev.com/2016/12/14/configure-and-practice-backup-and-recovery-for-oracle-database-in-cloud-dbaas/


Create a clone database in Oracle Cloud

http://kamranagayev.com/2016/12/10/create-a-clone-database-in-oracle-cloud/


Step by step guide to create an Oracle Database in the Cloud

http://kamranagayev.com/2016/12/05/step-by-step-guide-to-create-an-oracle-database-in-the-cloud/


Ok, now let’s get started.

First of all, login to your Oracle Cloud account, switch to Oracle Database Cloud Service and create a new Service. Provide a service name, SSH Public Key (check above mentioned articles to see how to create a SSH public key), choose “Enterprise Edition – Extreme Performance” for Software Edition option and click Next.

Image 1


We will create a standby database based on on-premises production database, so in the next screen provide any database name. We will delete it once it is created and will create a standby database using DUPLICATE DATABASE command.


Image 2


Review the configuration and click Create to create a Database Cloud Service instance.


It take only 20 minutes to create a new machine, install an Oracle Software and create a new database in the cloud.

Next, create a new virtual machine in your own laptop, install Oracle 11.2.4 on Linux (OEL is preferred) and add two network cards – “Host-only Adapter” and “Bridged Adapter”. “Host-Only Adapter” is used to connect to the virtual machine from the host machine and “Bridged Adapter” is used to connect from the Virtual Machine to the outside world (internet, cloud instance and etc.). Enable both network devices, make sure you have internet connection, edit tnsnames.ora file as follows and use tnsping to ping the cloud host.


STBDB =

  (DESCRIPTION =

    (ADDRESS_LIST =

      (ADDRESS = (PROTOCOL = TCP)(HOST = 140.86.3.98)(PORT = 1521))

    )

    (CONNECT_DATA =

      (SERVICE_NAME = STBDB)

      (UR = A)

    )

  )


Next, use private key to connect to the cloud machine using putty and drop the ORCL database in the cloud machine


Drop the database in the cloud machine:

[oracle@srvtst ~]$ sqlplus / as sysdba


SQL> startup force mount exclusive restrict;

ORACLE instance started.


Total System Global Area 2655657984 bytes

Fixed Size                  2256192 bytes

Variable Size             637534912 bytes

Database Buffers         1996488704 bytes

Redo Buffers               19378176 bytes

Database mounted.

SQL> drop database;

Database dropped.


SQL>


Before trying to connect to the new dummy instance on the cloud machine, you have to enable dblistener access rule. Open the database service and Access Rule from the menu.


Image 3


Click on Actions menu for the ora_p2_dblistener rule and enable it


Image 4


Now you will be able to using tnsping to test the connection:

[oracle@ocm11g admin]$ tnsping STBDB

Attempting to contact (DESCRIPTION = (ADDRESS_LIST = (ADDRESS = (PROTOCOL = TCP)(HOST = 140.86.3.98)(PORT = 1521))) (CONNECT_DATA = (SERVICE_NAME = STBDB) (UR = A)))

OK (250 msec)

[oracle@ocm11g admin]$


In order to connect to the cloud machine from outside, you need to configure SSH. Open Virtual Machine box, switch to .ssh folder and generate ssh key using ssh-keygen utility as follows:

[oracle@ocm11g ~]$ cd .ssh

[oracle@ocm11g .ssh]$ ssh-keygen

Generating public/private rsa key pair.

Enter file in which to save the key (/home/oracle/.ssh/id_rsa):

Enter passphrase (empty for no passphrase):

Enter same passphrase again:

Your identification has been saved in /home/oracle/.ssh/id_rsa.

Your public key has been saved in /home/oracle/.ssh/id_rsa.pub.

The key fingerprint is:

1f:e8:8d:08:78:80:12:e5:c6:cb:cb:7a:97:2e:1b:02 oracle@ocm11g

The key’s randomart image is:

+–[ RSA 2048]—-+

|…              |

| =               |

|o =              |

|.o +     .       |

|E + o   S .      |

|.. o . o + .     |

|. +  .. o o      |

| oo.o            |

|…=.            |

+—————–+

[oracle@ocm11g .ssh]$


Now copy the source of id_rsa.pub file and append it to the /home/oracle/.ssh/authorized_keys file at the cloud machine.

[oracle@ocm11g .ssh]$ more id_rsa.pub

ssh-rsa AAAAB3NzaC1yc2EAAAABIwAAAQEAn2fjBDvcycbxQxVrzFQS2URSERkdJXTdpHGw68GiQWUnCR8T8jSwntDWH4az37Lyj7WgN0NGW7HFWC0m9EMJ/RfCPj6SXnCjdXOO2qwuxMit9B9suqm7plfQl+HpGTrdx6KIW2UXW1M/7l2CDNjJD7zDFZ4MNwBIOtlT5lpHm61iquVeBUwFg/3fjpnk6/IjX5K0mM8gLHWpc6WEDLcLKHgKWcVUGvY/KF1W2ehbGIo6tSDkDV2wwEj8H5G5DCxLs2Mczq1dzgt99SLVpw3s7/aGRWrzPVRVPjmn1Y7AHnDFNFvP32V3fzKCaAHHQLjDeA6ZQyjMjBUFAxWuiymunw== oracle@ocm11g

Now test the connection from virtual box to the cloud machine:


[oracle@ocm11g .ssh]$ ssh 140.86.3.98

The authenticity of host ‘140.86.3.98 (140.86.3.98)’ can’t be established.

RSA key fingerprint is 73:93:3c:62:41:d4:12:aa:09:07:c7:94:aa:ea:00:16.

Are you sure you want to continue connecting (yes/no)? yes

Warning: Permanently added ‘140.86.3.98’ (RSA) to the list of known hosts.

[oracle@srvtst ~]$ exit

logout

Connection to 140.86.3.98 closed.


Before duplicating the database, create necessary folders on the cloud machine


[oracle@ocm11g .ssh]$ ssh 140.86.3.98

 [oracle@srvtst ~]$ mkdir -p admin/STBDB/adump

[oracle@srvtst ~]$ mkdir -p oradata/STBDB

[oracle@srvtst ~]$ mkdir flash_recovery_area

[oracle@srvtst ~]$ mkdir arch


Create a parameter file to start standby instance:


vi /home/oracle/pfile.ora


*.audit_file_dest=’/home/oracle/admin/STBDB/adump’

*.control_files=’/home/oracle/oradata/STBDB/control01.ctl’

*.db_file_name_convert=’/u03/oracle/oradata/PROD/’,’/home/oracle/oradata/STBDB/’

*.db_name=’PROD’

*.db_unique_name=’STBDB’

*.db_recovery_file_dest=’/home/oracle/flash_recovery_area’

*.db_recovery_file_dest_size=5g

*.fal_client=’STBDB’

*.fal_server=’PROD’

*.log_archive_dest_1=’location=/home/oracle/arch VALID_FOR=(ALL_LOGFILES,ALL_ROLES)

DB_UNIQUE_NAME=STBDB’

*.log_file_name_convert=’/u03/oracle/oradata/PROD/’,’/home/oracle/oradata/STBDB/’

*.compatible=’11.2.0.4.0′


Connect to SQL*Plus, create spfile and open the instance in the NOMOUNT mode:


[oracle@srvtst ~]$ sqlplus / as sysdba

Connected to an idle instance.


SQL> startup nomount pfile=’/home/oracle/pfile.ora’;

ORACLE instance started.


Total System Global Area  229683200 bytes

Fixed Size                  2251936 bytes

Variable Size             171967328 bytes

Database Buffers           50331648 bytes

Redo Buffers                5132288 bytes


SQL> create spfile from pfile=’/home/oracle/pfile.ora’;


File created.


SQL> shut immediate

ORA-01507: database not mounted


ORACLE instance shut down.

SQL> startup nomount;

ORACLE instance started.


Total System Global Area  229683200 bytes

Fixed Size                  2251936 bytes

Variable Size             171967328 bytes

Database Buffers           50331648 bytes

Redo Buffers                5132288 bytes

SQL>


Create a password file on the standby machine

[oracle@srvtst ~]$ orapwd file=/u01/app/oracle/product/11.2.0/dbhome_1/dbs/orapwSTBDB password=oracle entries=5


Connect to both target and auxiliary instances and duplicate the database:

[oracle@ocm11g dbs]$ rman target sys/oracle@PROD auxiliary sys/oracle@STBDB

connected to target database: PROD (DBID=345613202)

connected to auxiliary database: PROD (not mounted)


RMAN> duplicate target database for standby from active database;

Starting Duplicate Db at 20-JAN-17

using target database control file instead of recovery catalog

allocated channel: ORA_AUX_DISK_1

channel ORA_AUX_DISK_1: SID=171 device type=DISK


contents of Memory Script:

{

   backup as copy reuse

   targetfile  ‘/u03/oracle/product/11.2.4/db_1/dbs/orapwPROD’ auxiliary format

 ‘/u01/app/oracle/product/11.2.0/dbhome_1/dbs/orapwSTBDB’   ;

}

executing Memory Script


Starting backup at 20-JAN-17

allocated channel: ORA_DISK_1

channel ORA_DISK_1: SID=36 device type=DISK

Finished backup at 20-JAN-17


contents of Memory Script:

{

   backup as copy current controlfile for standby auxiliary format  ‘/home/oracle/oradata/STBDB/control01.ctl’;

}

executing Memory Script


Starting backup at 20-JAN-17

using channel ORA_DISK_1

channel ORA_DISK_1: starting datafile copy

copying standby control file

output file name=/u03/oracle/product/11.2.4/db_1/dbs/snapcf_PROD.f tag=TAG20170120T145657 RECID=3 STAMP=933778620

channel ORA_DISK_1: datafile copy complete, elapsed time: 00:02:05

Finished backup at 20-JAN-17


contents of Memory Script:

{

   sql clone ‘alter database mount standby database’;

}

executing Memory Script


sql statement: alter database mount standby database


contents of Memory Script:

{

   set newname for tempfile  1 to

 “/home/oracle/oradata/STBDB/temp01.dbf”;

   switch clone tempfile all;

   set newname for datafile  1 to

 “/home/oracle/oradata/STBDB/system01.dbf”;

   set newname for datafile  2 to

 “/home/oracle/oradata/STBDB/sysaux01.dbf”;

   set newname for datafile  3 to

 “/home/oracle/oradata/STBDB/undotbs01.dbf”;

   set newname for datafile  4 to

 “/home/oracle/oradata/STBDB/users01.dbf”;

   backup as copy reuse

   datafile  1 auxiliary format

 “/home/oracle/oradata/STBDB/system01.dbf”   datafile

 2 auxiliary format

 “/home/oracle/oradata/STBDB/sysaux01.dbf”   datafile

 3 auxiliary format

 “/home/oracle/oradata/STBDB/undotbs01.dbf”   datafile

 4 auxiliary format

 “/home/oracle/oradata/STBDB/users01.dbf”   ;

   sql ‘alter system archive log current’;

}

executing Memory Script

executing command: SET NEWNAME

renamed tempfile 1 to /home/oracle/oradata/STBDB/temp01.dbf in control file

executing command: SET NEWNAME

executing command: SET NEWNAME

executing command: SET NEWNAME

executing command: SET NEWNAME


Starting backup at 20-JAN-17

using channel ORA_DISK_1

channel ORA_DISK_1: starting datafile copy

input datafile file number=00001 name=/u03/oracle/oradata/PROD/system01.dbf

output file name=/home/oracle/oradata/STBDB/system01.dbf tag=TAG20170120T145917

channel ORA_DISK_1: datafile copy complete, elapsed time: 02:14:37

channel ORA_DISK_1: starting datafile copy

input datafile file number=00002 name=/u03/oracle/oradata/PROD/sysaux01.dbf

output file name=/home/oracle/oradata/STBDB/sysaux01.dbf tag=TAG20170120T145917

channel ORA_DISK_1: datafile copy complete, elapsed time: 01:24:17

channel ORA_DISK_1: starting datafile copy

input datafile file number=00003 name=/u03/oracle/oradata/PROD/undotbs01.dbf

output file name=/home/oracle/oradata/STBDB/undotbs01.dbf tag=TAG20170120T145917

channel ORA_DISK_1: datafile copy complete, elapsed time: 00:05:15

channel ORA_DISK_1: starting datafile copy

input datafile file number=00004 name=/u03/oracle/oradata/PROD/users01.dbf

output file name=/home/oracle/oradata/STBDB/users01.dbf tag=TAG20170120T145917

channel ORA_DISK_1: datafile copy complete, elapsed time: 00:00:56

Finished backup at 20-JAN-17


sql statement: alter system archive log current


contents of Memory Script:

{

   switch clone datafile all;

}

executing Memory Script


datafile 1 switched to datafile copy

input datafile copy RECID=3 STAMP=933824671 file name=/home/oracle/oradata/STBDB/system01.dbf

datafile 2 switched to datafile copy

input datafile copy RECID=4 STAMP=933824671 file name=/home/oracle/oradata/STBDB/sysaux01.dbf

datafile 3 switched to datafile copy

input datafile copy RECID=5 STAMP=933824671 file name=/home/oracle/oradata/STBDB/undotbs01.dbf

datafile 4 switched to datafile copy

input datafile copy RECID=6 STAMP=933824671 file name=/home/oracle/oradata/STBDB/users01.dbf

Finished Duplicate Db at 20-JAN-17


RMAN>


Connect to cloud database and query V$DATABASE view:

SQL> select name, db_unique_name, database_role, switchover_status from v$database;

NAME      DB_UNIQUE_NAME                 DATABASE_ROLE    SWITCHOVER_STATUS

——— —————————— —————- ——————–

PROD      STBDB                          PHYSICAL STANDBY TO PRIMARY


SQL>


Make sure you set LOG_ARCHIVE_DEST_2 parameter on the on-premises database and specify the instance running on the cloud machine:


SQL> ALTER SYSTEM SET log_archive_dest_2=’SERVICE=STBDB ASYNC VALID_FOR=(ONLINE_LOGFILES,PRIMARY_ROLE) DB_UNIQUE_NAME=STBDB’; 

System altered.

SQL>


No switch to the cloud machine and start the apply process:

SQL> ALTER DATABASE RECOVER MANAGED STANDBY DATABASE DISCONNECT;

Database altered.

SQL>


Ok, the standby database is ready. Perform some logfile switches, create a new table and switch log file again. Move the standby machine and check alert.log file to see if log files are moved and applied to the standby database.

SQL> alter system switch logfile;

System altered.


SQL> create table mytable as select * from dba_objects where rownum<=100;

Table created.


SQL> alter system switch logfile;

System altered.


SQL>


Next, open the standby database in the read only mode and see if you can query the table created on on-premises database:

SQL> alter database recover managed standby database cancel;

Database altered.


SQL> alter database open read only;

Database altered.


SQL> select count(1) from mytable;

  COUNT(1)

———-

       100


SQL>


Image 5


Image 6


As you see, the table has been moved within archived log file to the cloud machine and applied to the standby instance.

Performing disaster recovery with RMAN in Oracle Cloud using On-Premises backups stored in Oracle Public Cloud Storage

$
0
0

In the previous blog posts you have seen how to create a disaster recovery for on-premises Oracle Database by creating a standby database in Oracle Cloud. Sometimes, you might not need to create a standby database, but just store the backup of your database in Oracle Cloud Storage and then use it to create a database in the cloud in the feature. In this blog post I will show you how to take backup of on-premises database to Oracle Cloud Storage and use it to perform a disaster recovery by restoring/recovering from backup to the instance in the cloud and perform recovery of on-premises database using backups stored in the cloud storage using RMAN.

First of all, we need to download and install a backup model to on-premises db. Open the following link and download Oracle Database Cloud Backup Module :

http://www.oracle.com/technetwork/database/availability/oracle-cloud-backup-2162729.html


Create folder to store wallets and lib file, extract the zip file and install it:

[oracle@ocm11g ~]$ mkdir wallet lib

[oracle@ocm11g tmp]$ java -jar opc_install.jar -serviceName Storage -identityDomain yourIdentityDomain -opcID YourOpcId -opcPass YourOpcPassword -walletDir /home/oracle/wallet -libDir /home/oracle/lib

Oracle Database Cloud Backup Module Install Tool, build 2016-10-07

Oracle Database Cloud Backup Module credentials are valid.

Oracle Database Cloud Backup Module wallet created in directory /home/oracle/wallet.

Oracle Database Cloud Backup Module initialization file /u03/oracle/product/11.2.4/db_1/dbs/opcPROD.ora created.

Downloading Oracle Database Cloud Backup Module Software Library from file opc_linux64.zip.

Downloaded 26528348 bytes in 12 seconds. Transfer rate was 2210695 bytes/second.

Download complete.

[oracle@ocm11g tmp]$


The name of on-premises database is PROD. Now connect to RMAN and change the following configurations. Configure the channel to use SBT library which enable to store backups to the cloud (libopc.so) and provide OPC_FILE destination that contains Oracle Backup Cloud Service container URL.


RMAN> CONFIGURE CHANNEL DEVICE TYPE ‘SBT_TAPE’ PARMS  ‘SBT_LIBRARY=/home/oracle/lib/libopc.so ENV=(OPC_PFILE=/u03/oracle/product/11.2.4/db_1/dbs/opcPROD.ora)’;


new RMAN configuration parameters:

CONFIGURE CHANNEL DEVICE TYPE ‘SBT_TAPE’ PARMS  ‘SBT_LIBRARY=/home/oracle/lib/libopc.so ENV=(OPC_PFILE=/u03/oracle/product/11.2.4/db_1/dbs/opcPROD.ora)’;

new RMAN configuration parameters are successfully stored


Enable autobackup of controlfile:

RMAN> CONFIGURE CONTROLFILE AUTOBACKUP ON;


new RMAN configuration parameters:

CONFIGURE CONTROLFILE AUTOBACKUP ON;

new RMAN configuration parameters are successfully stored


Set the high compression for backups to consume less space in the cloud storage:

RMAN> CONFIGURE COMPRESSION ALGORITHM ‘HIGH’;


new RMAN configuration parameters:

CONFIGURE COMPRESSION ALGORITHM ‘HIGH’ AS OF RELEASE ‘DEFAULT’ OPTIMIZE FOR LOAD TRUE;

new RMAN configuration parameters are successfully stored


Change the default channel to tape (media -> Oracle Cloud Backup Storage)

RMAN> CONFIGURE DEFAULT DEVICE TYPE TO ‘SBT_TAPE’;


new RMAN configuration parameters:

CONFIGURE DEFAULT DEVICE TYPE TO ‘SBT_TAPE’;

new RMAN configuration parameters are successfully stored

RMAN>


Now connect to RMAN and run SHOW ALL command to see the backup configurations:

[oracle@ocm11g ~]$ rman target /


RMAN> show all;

using target database control file instead of recovery catalog

RMAN configuration parameters for database with db_unique_name PROD are:

CONFIGURE RETENTION POLICY TO REDUNDANCY 1; # default

CONFIGURE BACKUP OPTIMIZATION OFF; # default

CONFIGURE DEFAULT DEVICE TYPE TO ‘SBT_TAPE’;

CONFIGURE CONTROLFILE AUTOBACKUP ON;

CONFIGURE CONTROLFILE AUTOBACKUP FORMAT FOR DEVICE TYPE SBT_TAPE TO ‘%F’; # default

CONFIGURE CONTROLFILE AUTOBACKUP FORMAT FOR DEVICE TYPE DISK TO ‘%F’; # default

CONFIGURE DEVICE TYPE SBT_TAPE PARALLELISM 1 BACKUP TYPE TO BACKUPSET; # default

CONFIGURE DEVICE TYPE DISK PARALLELISM 1 BACKUP TYPE TO BACKUPSET; # default

CONFIGURE DATAFILE BACKUP COPIES FOR DEVICE TYPE SBT_TAPE TO 1; # default

CONFIGURE DATAFILE BACKUP COPIES FOR DEVICE TYPE DISK TO 1; # default

CONFIGURE ARCHIVELOG BACKUP COPIES FOR DEVICE TYPE SBT_TAPE TO 1; # default

CONFIGURE ARCHIVELOG BACKUP COPIES FOR DEVICE TYPE DISK TO 1; # default

CONFIGURE CHANNEL DEVICE TYPE ‘SBT_TAPE’ PARMS  ‘SBT_LIBRARY=/home/oracle/lib/libopc.so ENV=(OPC_PFILE=/u03/oracle/product/11.2.4/db_1/dbs/opcPROD.ora)’;

CONFIGURE MAXSETSIZE TO UNLIMITED; # default

CONFIGURE ENCRYPTION FOR DATABASE OFF; # default

CONFIGURE ENCRYPTION ALGORITHM ‘AES128’; # default

CONFIGURE COMPRESSION ALGORITHM ‘HIGH’ AS OF RELEASE ‘DEFAULT’ OPTIMIZE FOR LOAD TRUE;

CONFIGURE ARCHIVELOG DELETION POLICY TO NONE; # default

CONFIGURE SNAPSHOT CONTROLFILE NAME TO ‘/u03/oracle/product/11.2.4/db_1/dbs/snapcf_PROD.f’; # default


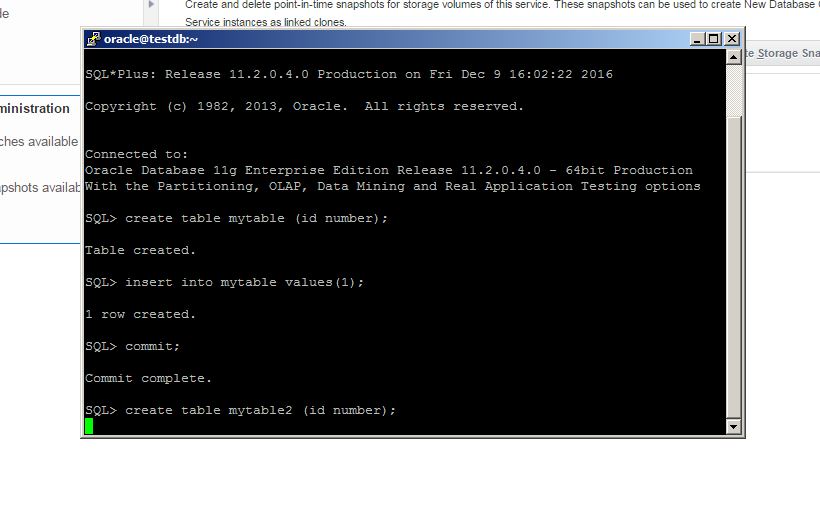
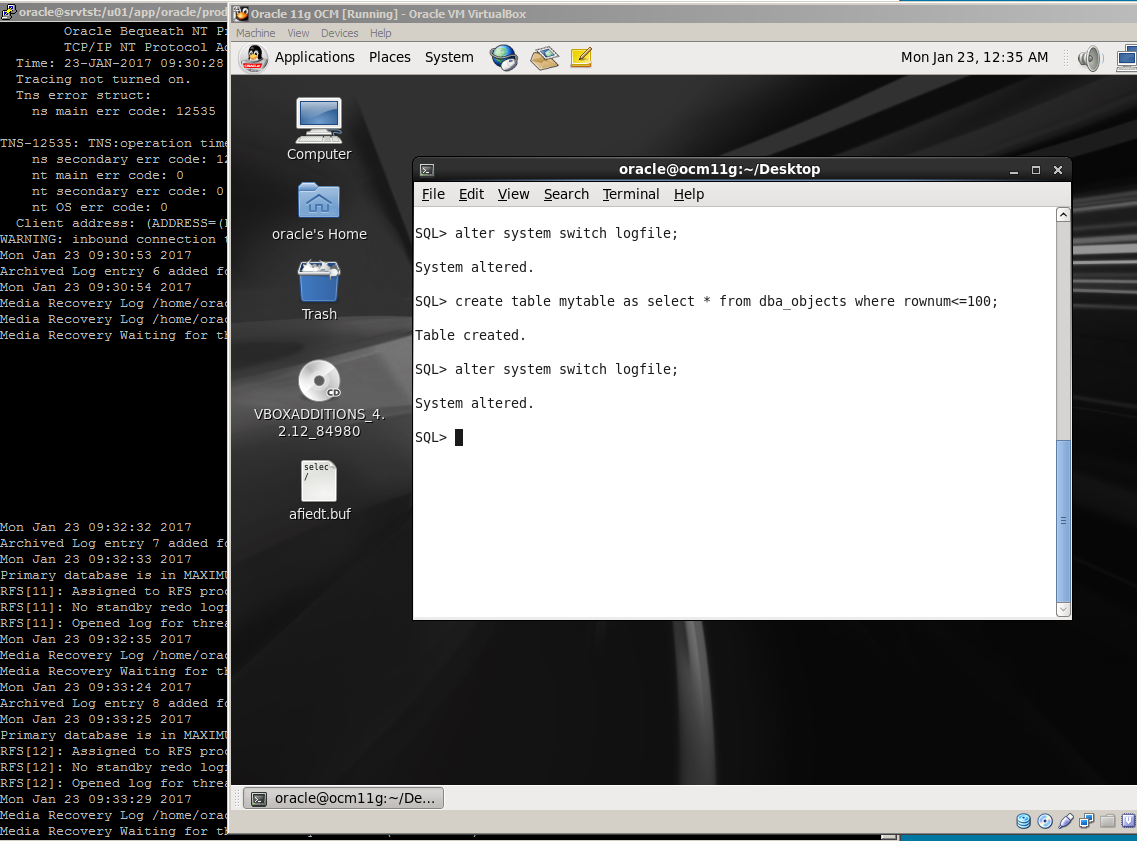
Before taking the backup, create a table at on-premises database. We will query it after disaster recovery in the cloud db.


SQL> create table mytable as select * from dba_objects where rownum<=100;

Table created.


SQL> select count(1) from mytable;

  COUNT(1)

———-

       100


SQL>


Now enable encryption (set the password for backups) and take backup of the database:


RMAN> set encryption on identified by “mypass” only;

executing command: SET encryption


RMAN> backup database plus archivelog;

Starting backup at 10-FEB-17

current log archived

allocated channel: ORA_SBT_TAPE_1

channel ORA_SBT_TAPE_1: SID=33 device type=SBT_TAPE

channel ORA_SBT_TAPE_1: Oracle Database Backup Service Library VER=3.16.9.21

channel ORA_SBT_TAPE_1: starting archived log backup set

channel ORA_SBT_TAPE_1: specifying archived log(s) in backup set

input archived log thread=1 sequence=48 RECID=71 STAMP=935603816

channel ORA_SBT_TAPE_1: starting piece 1 at 10-FEB-17

channel ORA_SBT_TAPE_1: finished piece 1 at 10-FEB-17

piece handle=17rs8bjd_1_1 tag=TAG20170210T175700 comment=API Version 2.0,MMS Version 3.16.9.21

channel ORA_SBT_TAPE_1: backup set complete, elapsed time: 00:00:25

Finished backup at 10-FEB-17


Starting backup at 10-FEB-17

using channel ORA_SBT_TAPE_1

channel ORA_SBT_TAPE_1: starting full datafile backup set

channel ORA_SBT_TAPE_1: specifying datafile(s) in backup set

input datafile file number=00001 name=/u03/oracle/oradata/PROD/system01.dbf

input datafile file number=00002 name=/u03/oracle/oradata/PROD/sysaux01.dbf

input datafile file number=00003 name=/u03/oracle/oradata/PROD/undotbs01.dbf

input datafile file number=00004 name=/u03/oracle/oradata/PROD/users01.dbf

channel ORA_SBT_TAPE_1: starting piece 1 at 10-FEB-17

channel ORA_SBT_TAPE_1: finished piece 1 at 10-FEB-17

piece handle=18rs8bk6_1_1 tag=TAG20170210T175726 comment=API Version 2.0,MMS Version 3.16.9.21

channel ORA_SBT_TAPE_1: backup set complete, elapsed time: 02:57:07

Finished backup at 10-FEB-17


Starting backup at 10-FEB-17

current log archived

using channel ORA_SBT_TAPE_1

channel ORA_SBT_TAPE_1: starting archived log backup set

channel ORA_SBT_TAPE_1: specifying archived log(s) in backup set

input archived log thread=1 sequence=49 RECID=72 STAMP=935605482

input archived log thread=1 sequence=50 RECID=73 STAMP=935614475

channel ORA_SBT_TAPE_1: starting piece 1 at 10-FEB-17

channel ORA_SBT_TAPE_1: finished piece 1 at 10-FEB-17

piece handle=1ars8m0c_1_1 tag=TAG20170210T205435 comment=API Version 2.0,MMS Version 3.16.9.21

channel ORA_SBT_TAPE_1: backup set complete, elapsed time: 00:09:25

Finished backup at 10-FEB-17


Starting Control File and SPFILE Autobackup at 10-FEB-17

piece handle=c-345613202-20170210-02 comment=API Version 2.0,MMS Version 3.16.9.21

Finished Control File and SPFILE Autobackup at 10-FEB-17


RMAN>


The backup command completed successfully and all backups are stored in Oracle Cloud Backup Storage.


Now let’s perform a disaster recovery in the cloud machine. Create a new cloud database instance, configure SSH connection from on-premises to the cloud host. Copy opc_install.zip file you have downloaded from OTN to the cloud host and install it as you did it at on-premises host. Drop the database if there’s any, connect to RMAN and start it in NOMOUNT mode. Provide the RMAN password, allocate a channel as you did at on-premises database and restore the spfile:


RMAN> STARTUP NOMOUNT;

RMAN> set decryption identified by “mypass”;


executing command: SET decryption

using target database control file instead of recovery catalog


RMAN> run

2> {

3> allocate channel t1 type ‘SBT_TAPE’ PARMS  ‘SBT_LIBRARY=/home/oracle/lib/libopc.so ENV=(OPC_PFILE=/u01/app/oracle/product/11.2.0/dbhome_1/dbs/opcPROD.ora)’;

4> set dbid=345613202;

5> restore spfile to pfile ‘/tmp/pfile.ora’ from autobackup;

6> }


allocated channel: t1

channel t1: SID=171 device type=SBT_TAPE

channel t1: Oracle Database Backup Service Library VER=3.16.9.21


executing command: SET DBID


Starting restore at 11-FEB-17


channel t1: looking for AUTOBACKUP on day: 20170211

channel t1: looking for AUTOBACKUP on day: 20170210

channel t1: AUTOBACKUP found: c-345613202-20170210-02

channel t1: restoring spfile from AUTOBACKUP c-345613202-20170210-02

channel t1: SPFILE restore from AUTOBACKUP complete

Finished restore at 11-FEB-17

released channel: t1


RMAN>


Server parameter file is restored. If you need to specify different location for some parameters, create a readable parameter file from it, make your changes, create a server parameter file from it and start the database in NOMOUNT mode using the restored (and modified) spfile.

SQL> startup nomount force;

ORACLE instance started.


Total System Global Area 1235959808 bytes

Fixed Size                  2252784 bytes

Variable Size             385875984 bytes

Database Buffers          838860800 bytes

Redo Buffers                8970240 bytes

SQL> exit


Now restore controlfile from autobackup:

RMAN> set decryption identified by “mypass”;


executing command: SET decryption


RMAN> run

2> {

3> allocate channel t1 type ‘SBT_TAPE’ PARMS  ‘SBT_LIBRARY=/home/oracle/lib/libopc.so ENV=(OPC_PFILE=/u01/app/oracle/product/11.2.0/dbhome_1/dbs/opcPROD.ora)’;

4> set dbid=345613202;

5> restore controlfile from autobackup;

6> }


allocated channel: t1

channel t1: SID=134 device type=SBT_TAPE

channel t1: Oracle Database Backup Service Library VER=3.16.9.21


executing command: SET DBID


Starting restore at 11-FEB-17


channel t1: looking for AUTOBACKUP on day: 20170211

channel t1: looking for AUTOBACKUP on day: 20170210

channel t1: AUTOBACKUP found: c-345613202-20170210-02

channel t1: restoring control file from AUTOBACKUP c-345613202-20170210-02

channel t1: control file restore from AUTOBACKUP complete

output file name=/u04/app/oracle/oradata/control01.ctl

output file name=/u04/app/oracle/oradata/control02.ctl

Finished restore at 11-FEB-17

released channel: t1


RMAN>


Controlfile are restored. Start the database in MOUNT mode and restore the datafiles. Specify a new folder using SET NEWNAME FOR DATABASE TO command as follows:

RMAN> run

2> {

3> allocate channel t1 type ‘SBT_TAPE’ PARMS  ‘SBT_LIBRARY=/home/oracle/lib/libopc.so ENV=(OPC_PFILE=/u01/app/oracle/product/11.2.0/dbhome_1/dbs/opcPROD.ora)’;

4> set newname for database to ‘/u04/app/oracle/oradata/%U.dbf’;

5> restore database;

6> switch datafile all;

7> }


allocated channel: t1

channel t1: SID=133 device type=SBT_TAPE

channel t1: Oracle Database Backup Service Library VER=3.16.9.21


executing command: SET NEWNAME


Starting restore at 11-FEB-17

Starting implicit crosscheck backup at 11-FEB-17

Crosschecked 1 objects

Finished implicit crosscheck backup at 11-FEB-17


Starting implicit crosscheck copy at 11-FEB-17

Crosschecked 2 objects

Finished implicit crosscheck copy at 11-FEB-17


searching for all files in the recovery area

cataloging files…

no files cataloged


channel t1: starting datafile backup set restore

channel t1: specifying datafile(s) to restore from backup set

channel t1: restoring datafile 00001 to /u04/app/oracle/oradata/data_D-PROD_TS-SYSTEM_FNO-1.dbf

channel t1: restoring datafile 00002 to /u04/app/oracle/oradata/data_D-PROD_TS-SYSAUX_FNO-2.dbf

channel t1: restoring datafile 00003 to /u04/app/oracle/oradata/data_D-PROD_TS-UNDOTBS1_FNO-3.dbf

channel t1: restoring datafile 00004 to /u04/app/oracle/oradata/data_D-PROD_TS-USERS_FNO-4.dbf

channel t1: reading from backup piece 18rs8bk6_1_1

channel t1: piece handle=18rs8bk6_1_1 tag=TAG20170210T175726

channel t1: restored backup piece 1

channel t1: restore complete, elapsed time: 00:00:45

Finished restore at 11-FEB-17


datafile 1 switched to datafile copy

input datafile copy RECID=14 STAMP=935693831 file name=/u04/app/oracle/oradata/data_D-PROD_TS-SYSTEM_FNO-1.dbf

datafile 2 switched to datafile copy

input datafile copy RECID=15 STAMP=935693831 file name=/u04/app/oracle/oradata/data_D-PROD_TS-SYSAUX_FNO-2.dbf

datafile 3 switched to datafile copy

input datafile copy RECID=16 STAMP=935693831 file name=/u04/app/oracle/oradata/data_D-PROD_TS-UNDOTBS1_FNO-3.dbf

datafile 4 switched to datafile copy

input datafile copy RECID=17 STAMP=935693831 file name=/u04/app/oracle/oradata/data_D-PROD_TS-USERS_FNO-4.dbf

released channel: t1


RMAN>


Now run ALTER DATABASE RENAME FILE command to rename redo log files:

SQL> alter database rename file ‘/u03/oracle/oradata/PROD/redo03.log’ to ‘/u04/app/oracle/oradata/redo03.log’;

Database altered.


SQL> alter database rename file ‘/u03/oracle/oradata/PROD/redo02.log’ to ‘/u04/app/oracle/oradata/redo02.log’;

Database altered.


SQL> alter database rename file ‘/u03/oracle/oradata/PROD/redo01.log’ to ‘/u04/app/oracle/oradata/redo01.log’;

Database altered.


SQL>


Now run RECOVER DATABASE command to recover the database and open the database:


RMAN> set decryption identified by “mypass”;


executing command: SET decryption


RMAN> run

2> {

3> allocate channel t1 type ‘SBT_TAPE’ PARMS  ‘SBT_LIBRARY=/home/oracle/lib/libopc.so ENV=(OPC_PFILE=/u01/app/oracle/product/11.2.0/dbhome_1/dbs/opcPROD.ora)’;

4> recover database;

5> }


allocated channel: t1

channel t1: SID=125 device type=SBT_TAPE

channel t1: Oracle Database Backup Service Library VER=3.16.9.21


Starting recover at 11-FEB-17


starting media recovery


channel t1: starting archived log restore to default destination

channel t1: restoring archived log

archived log thread=1 sequence=49

channel t1: restoring archived log

archived log thread=1 sequence=50

channel t1: reading from backup piece 1ars8m0c_1_1

channel t1: piece handle=1ars8m0c_1_1 tag=TAG20170210T205435

channel t1: restored backup piece 1

channel t1: restore complete, elapsed time: 00:00:07

archived log file name=/u03/app/oracle/fast_recovery_area/PROD/archivelog/2017_02_11/o1_mf_1_49_d9yqs878_.arc thread=1 sequence=49

channel default: deleting archived log(s)

archived log file name=/u03/app/oracle/fast_recovery_area/PROD/archivelog/2017_02_11/o1_mf_1_49_d9yqs878_.arc RECID=75 STAMP=935693995

archived log file name=/u03/app/oracle/fast_recovery_area/PROD/archivelog/2017_02_11/o1_mf_1_50_d9yqs8cn_.arc thread=1 sequence=50

channel default: deleting archived log(s)

archived log file name=/u03/app/oracle/fast_recovery_area/PROD/archivelog/2017_02_11/o1_mf_1_50_d9yqs8cn_.arc RECID=74 STAMP=935693994

unable to find archived log

archived log thread=1 sequence=51

released channel: t1

RMAN-00571: ===========================================================

RMAN-00569: =============== ERROR MESSAGE STACK FOLLOWS ===============

RMAN-00571: ===========================================================

RMAN-03002: failure of recover command at 02/11/2017 19:00:00

RMAN-06054: media recovery requesting unknown archived log for thread 1 with sequence 51 and starting SCN of 1153764


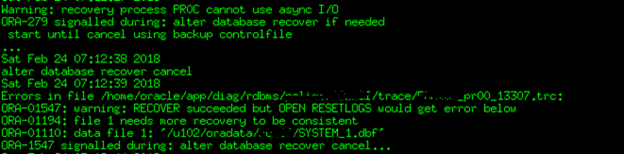
RMAN> alter database open resetlogs;

database opened


RMAN>


Connect to SQL*Plus and query the table you have created before taking a backup at on-premises database:

SQL> select count(1) from mytable;


  COUNT(1)

———-

       100


SQL>


Great! We have successfully performed a disaster recovery of on-premises database to the cloud using RMAN backups stored in Oracle Cloud Storage!

Now let’s use backups stored in the cloud to perform a recovery to on-premises database. Let’s create a new table, take backup of the datafile, corrupt a block of the datafile and recover it from backups stored in the cloud.


SQL> create table test_table tablespace users as select * from dba_objects where rownum<=10;

Table created.


RMAN> set encryption on identified by “mypass” only;

executing command: SET encryption


RMAN> backup datafile 4;               


Starting backup at 11-FEB-17

using channel ORA_SBT_TAPE_1

channel ORA_SBT_TAPE_1: starting full datafile backup set

channel ORA_SBT_TAPE_1: specifying datafile(s) in backup set

input datafile file number=00004 name=/u03/oracle/oradata/PROD/users01.dbf

channel ORA_SBT_TAPE_1: starting piece 1 at 11-FEB-17

channel ORA_SBT_TAPE_1: finished piece 1 at 11-FEB-17

piece handle=1drsaim0_1_1 tag=TAG20170211T141008 comment=API Version 2.0,MMS Version 3.16.9.21

channel ORA_SBT_TAPE_1: backup set complete, elapsed time: 00:00:45

Finished backup at 11-FEB-17


Starting Control File and SPFILE Autobackup at 11-FEB-17

piece handle=c-345613202-20170211-00 comment=API Version 2.0,MMS Version 3.16.9.21

Finished Control File and SPFILE Autobackup at 11-FEB-17

RMAN> exit


SQL> SELECT header_block FROM dba_segments WHERE segment_name=’TEST_TABLE’;

HEADER_BLOCK

————

                 170


SQL>


[oracle@ocm11g ~]$ dd of=/u03/oracle/oradata/PROD/users01.dbf bs=8192 conv=notrunc seek=170 <<EOF

> Corruption

> Corruption

> EOF

0+1 records in

0+1 records out

23 bytes (23 B) copied, 0.000147784 s, 156 kB/s

[oracle@ocm11g ~]$ sqlplus / as sysdba


SQL> alter system flush buffer_cache;

System altered.


SQL> select count(1) from test_table;

select count(1) from test_table

                     *

ERROR at line 1:

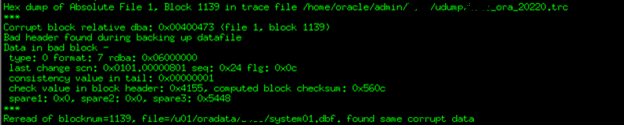
ORA-01578: ORACLE data block corrupted (file # 4, block # 170)

ORA-01110: data file 4: ‘/u03/oracle/oradata/PROD/users01.dbf’


SQL> select * from v$database_block_corruption;

     FILE#     BLOCK#             BLOCKS CORRUPTION_CHANGE# CORRUPTIO

———- ———- ———- —————— ———

                 4               170              1                         0 CORRUPT


Ok, we have a corrupted block. Now connect to RMAN and recover it:


RMAN> recover datafile 4 block 170;


Starting recover at 11-FEB-17

using channel ORA_SBT_TAPE_1

using channel ORA_DISK_1


channel ORA_SBT_TAPE_1: restoring block(s)

channel ORA_SBT_TAPE_1: specifying block(s) to restore from backup set

restoring blocks of datafile 00004

channel ORA_SBT_TAPE_1: reading from backup piece 1drsaim0_1_1

channel ORA_SBT_TAPE_1: piece handle=1drsaim0_1_1 tag=TAG20170211T141008

channel ORA_SBT_TAPE_1: restored block(s) from backup piece 1

channel ORA_SBT_TAPE_1: block restore complete, elapsed time: 00:00:15


starting media recovery

media recovery complete, elapsed time: 00:00:01


Finished recover at 11-FEB-17


RMAN> exit


[oracle@ocm11g ~]$ sqlplus / as sysdba

SQL> select count(1) from test_table;


  COUNT(1)

———-

                10


SQL>


As you see, we used backups stored in Oracle Cloud Storage to recover a corrupted block of on-premises database.

Step by Step Mastering Oracle Database Cloud Service – DBaaS – in one pdf now!

$
0
0

Hello guys

After posting a few articles on DBaaS, I’ve decided to create a single pdf file and collect all my cloud related step by step practical blog posts in it. Click on the following image to download the pdf file and become Oracle DBaaS master! :) I will keep updating the pdf and hope it will be much easier fo you to get all articles in one shot!


Oracle DBaaS

Get your weekly OCM exam tip to your email – sign up at www.ocmguide.com

$
0
0

Dear reader.

You must have already known about my OCM exam Study Guide that I’ve published few months ago. If not, then get your pdf copy of sample chapters of the book from www.ocmguide.com now. With along the sample pdf copy you will also be registered for the weekly OCM exam tips email list!

Good luck to you with your exam preparation and feel free to contact me on any questions regarding the exam preparation. I’m ready to help you through it.

Check the following link to read the OCM tip of this week!


OCM Tip of the week – Implement fine-grained access control

http://www.ocmguide.com/ocm-tip-of-the-week-implement-fine-grained-access-control/ 

Perl related issues when running ./rootcrs.pl to deconfigure the node

$
0
0

Today while deconfiguring one failed node from the clusterware I faced some Perl related issues that blocked me to run ./rootcrs.pl command. After installing few required packages I was able to deconfigure the node. Check the steps and let me know if it helped you and if you had different errors


[root@oratest02 install]$ ./rootcrs.pl -deconfig -force -verbose
-bash: ./rootcrs.pl: /usr/bin/perl: bad interpreter: No such file or directory


I checked for perl and didn’t find it.
[root@oratest02 install]$ which perl
/usr/bin/which: no perl in (/usr/local/bin:/usr/bin:/usr/local/sbin:/usr/sbin:/home/oracle/.local/bin:/home/oracle/bin:/home/oracle/.local/bin:/home/oracle/bin:/u01/app/12.2.0.1/grid/bin)

If the perl wasn’t installed by default, install it:

[root@oratest02 install]# yum install perl -y

Then I got the following errors and installed the required perl modules as follows:

[root@oratest02 install]$ ./rootcrs.pl -deconfig -force -verbose
Can't locate Env.pm in @INC (@INC contains: /usr/local/lib64/perl5 /usr/local/share/perl5 /usr/lib64/perl5/vendor_perl /usr/share/perl5/vendor_perl /usr/lib64/perl5 /usr/share/perl5 . . ./../../perl/lib) at crsinstall.pm line 286.
BEGIN failed--compilation aborted at crsinstall.pm line 286.
Compilation failed in require at ./rootcrs.pl line 165.
BEGIN failed--compilation aborted at ./rootcrs.pl line 165.


[root@oratest02 install]# yum install perl-Env -y


[root@oratest02 install]$ ./rootcrs.pl -deconfig -force -verbose
Can't locate XML/Parser.pm in @INC (@INC contains: /usr/local/lib64/perl5 /usr/local/share/perl5 /usr/lib64/perl5/vendor_perl /usr/share/perl5/vendor_perl /usr/lib64/perl5 /usr/share/perl5 . . ./../../perl/lib) at crsutils.pm line 770.
BEGIN failed--compilation aborted at crsutils.pm line 770.
Compilation failed in require at crsinstall.pm line 290.
BEGIN failed--compilation aborted at crsinstall.pm line 290.
Compilation failed in require at ./rootcrs.pl line 165.
BEGIN failed--compilation aborted at ./rootcrs.pl line 165.
[root@oratest02 install]# yum install perl-XML-Parser -y

Finally I was able to run rootcrs.pl and deconfigure the node from the clusterware

[INS-20802] Creating Container Database for Oracle Grid Infrastructure Management Repository failed

$
0
0

After dealing with root.sh script to configure 3 node clusterware environment I succeeded but ended up with the following error when post configuration OUI returned the following error and was unable to create container database for  Oracle Grid Infrastructure Management Repository:

screenshot


There was no information in the mentioned log file, however the trace of database creation job was enabled and I was able to find a long trace file under the log directory, where I saw the following message:

set newname for datafile 1 to new;

set newname for datafile 3 to new;

set newname for datafile 4 to new;

restore datafile 1;

restore datafile 3;

restore datafile 4; }
[Thread-159] [ 2017-07-24 04:24:07.299 EDT ] [RMANEngine.executeImpl:1321] Notify reader to start reading
[Thread-177] [ 2017-07-24 04:24:07.300 EDT ] [RMANEngine.readSqlOutput:988] Log RMAN Output=echo set off
[Thread-177] [ 2017-07-24 04:24:07.300 EDT ] [RMANEngine.readSqlOutput:988] Log RMAN Output=
[Thread-177] [ 2017-07-24 04:24:07.305 EDT ] [RMANEngine.readSqlOutput:988] Log RMAN Output=RMAN> 2> 3> 4> 5> 6> 7> 8> 9> 10> 11> 12> 13>
[Thread-177] [ 2017-07-24 04:24:07.305 EDT ] [RMANEngine.readSqlOutput:988] Log RMAN Output=executing command: SET NEWNAME
[Thread-177] [ 2017-07-24 04:24:07.546 EDT ] [RMANEngine.readSqlOutput:988] Log RMAN Output=
[Thread-177] [ 2017-07-24 04:24:07.547 EDT ] [RMANEngine.readSqlOutput:988] Log RMAN Output=executing command: SET NEWNAME
[Thread-177] [ 2017-07-24 04:24:07.562 EDT ] [RMANEngine.readSqlOutput:988] Log RMAN Output=
[Thread-177] [ 2017-07-24 04:24:07.563 EDT ] [RMANEngine.readSqlOutput:988] Log RMAN Output=executing command: SET NEWNAME
[Thread-177] [ 2017-07-24 04:24:07.578 EDT ] [RMANEngine.readSqlOutput:988] Log RMAN Output=
[Thread-177] [ 2017-07-24 04:24:07.585 EDT ] [RMANEngine.readSqlOutput:988] Log RMAN Output=Starting restore at 24-JUL-17
[Thread-177] [ 2017-07-24 04:24:07.792 EDT ] [RMANEngine.readSqlOutput:988] Log RMAN Output=allocated channel: ORA_DISK_1
[Thread-177] [ 2017-07-24 04:24:07.797 EDT ] [RMANEngine.readSqlOutput:988] Log RMAN Output=channel ORA_DISK_1: SID=18 device type=DISK
[Thread-177] [ 2017-07-24 04:24:08.051 EDT ] [RMANEngine.readSqlOutput:988] Log RMAN Output=
[Thread-177] [ 2017-07-24 04:24:08.383 EDT ] [RMANEngine.readSqlOutput:988] Log RMAN Output=channel ORA_DISK_1: starting datafile backup set restore
[Thread-177] [ 2017-07-24 04:24:08.385 EDT ] [RMANEngine.readSqlOutput:988] Log RMAN Output=channel ORA_DISK_1: specifying datafile(s) to restore from backup set
[Thread-177] [ 2017-07-24 04:24:08.386 EDT ] [RMANEngine.readSqlOutput:988] Log RMAN Output=channel ORA_DISK_1: restoring datafile 00001 to +DATA
[Thread-177] [ 2017-07-24 04:24:08.387 EDT ] [RMANEngine.readSqlOutput:988] Log RMAN Output=channel ORA_DISK_1: reading from backup piece /u01/app/12.2.0.1/grid/assistants/dbca/templates/MGMTSeed_Database.dfb
[Thread-177] [ 2017-07-24 04:24:23.487 EDT ] [RMANEngine.readSqlOutput:988] Log RMAN Output=RMAN-00571: ===========================================================
[Thread-177] [ 2017-07-24 04:24:23.487 EDT ] [RMANEngine.readSqlOutput:988] Log RMAN Output=RMAN-00569: =============== ERROR MESSAGE STACK FOLLOWS ===============
[Thread-177] [ 2017-07-24 04:24:23.487 EDT ] [RMANEngine.readSqlOutput:988] Log RMAN Output=RMAN-00571: ===========================================================
[Thread-177] [ 2017-07-24 04:24:23.487 EDT ] [RMANEngine.readSqlOutput:988] Log RMAN Output=RMAN-03002: failure of restore command at 07/24/2017 04:24:23
[Thread-177] [ 2017-07-24 04:24:23.487 EDT ] [RMANEngine.readSqlOutput:988] Log RMAN Output=ORA-19870: error while restoring backup piece /u01/app/12.2.0.1/grid/assistants/dbca/templates/MGMTSeed_Database.dfb
[Thread-177] [ 2017-07-24 04:24:23.487 EDT ] [RMANEngine.readSqlOutput:988] Log RMAN Output=ORA-19872: Unexpected end of file at block 4800 while decompressing backup piece /u01/app/12.2.0.1/grid/assistants/dbca/templates/MGMTSeed_Database.dfb
[Thread-177] [ 2017-07-24 04:24:23.495 EDT ] [RMANEngine.readSqlOutput:988] Log RMAN Output=
[Thread-177] [ 2017-07-24 04:24:23.496 EDT ] [RMANEngine.readSqlOutput:988] Log RMAN Output=RMAN>
[Thread-177] [ 2017-07-24 04:24:23.496 EDT ] [RMANEngine.readSqlOutput:988] Log RMAN Output=echo set on
[Thread-177] [ 2017-07-24 04:24:23.504 EDT ] [RMANEngine.readSqlOutput:988] Log RMAN Output=set echo off;
[Thread-177] [ 2017-07-24 04:24:23.504 EDT ] [RMANEngine.readSqlOutput:1031] hasError is true
[Thread-177] [ 2017-07-24 04:24:23.504 EDT ] [RMANEngine.readSqlOutput:1037] ERROR TRACE DETECTED


So in ordreate a container database, the installer was trying to restore the database and was unable to do it and hit the following error:

ORA-19872: Unexpected end of file at block 4800 while decompressing backup piece /u01/app/12.2.0.1/grid/assistants/dbca/templates/MGMTSeed_Database.dfb

So the problem was with the backup piece of the MGMT database. Permission were ok, so I compared the size of the restored backup piece with the one in the downloaded zip file:

[root@oratest01 ~]# cd /u01/app/12.2.0.1/grid/assistants/dbca/templates/
[root@oratest01 templates]# ll
total 131452
-rw-r--r-- 1 oracle oinstall 5734 Jan 26 10:48 DomainServicesCluster_GIMR.dbc
-rw-r----- 1 oracle oinstall 18628608 Jan 26 10:46 MGMTSeed_Database.ctl
-rw-r----- 1 oracle oinstall 5177 Jan 26 10:48 MGMTSeed_Database.dbc
-rw-r----- 1 oracle oinstall 39321600 Jan 26 10:46 MGMTSeed_Database.dfb
-rw-r----- 1 oracle oinstall 10578 Jun 10 2016 New_Database.dbt
-rw-r----- 1 oracle oinstall 76619776 Jan 26 10:11 pdbseed.dfb
-rw-r----- 1 oracle oinstall 6579 Jan 26 10:11 pdbseed.xml


It was 39M in the extracted folder, and 104Mb in the zip file itself. Screenshot2


Somehow it was not correctly unzipped. I moved all files to the backup folder, uploaded backup pieces from the downloaded installation zip file to the same folder in the first node and restarted the configuration – and it succeeded.

Screenshot3


Good Luck!


OCM Exam Tips and Tricks at www.ocmguide.com

$
0
0

Dear friends

Hope most of you already got my book and started preparing for the OCM exam. Every month I get an email from my readers as well as from those who used my book and passed OCM exam successfully!

If you haven’t subscribed to the OCM Newsletter and want to read the previous articles, use the following link:
http://www.ocmguide.com/category/ocm-tips-and-tricks/


If you want to get free trial copy of the book in pdf format, use the following address:
http://www.ocmguide.com/


If you also want to successfully pass the exam, then use the following address to purchase the book:
https://www.amazon.com/Oracle-Certified-Master-Study-Guide/dp/1536800791/ref=sr_1_1?ie=UTF8&qid=1474879527&sr=8-1&keywords=oracle+exam+guide


If you are in my facebook friend list, you have already known that I collect picture of my readers and make them famous in my facebook account :) So if you are a reader of my book, please send me your photo with my book and become a famous! :)

Please do not hesitate to contact me directly regarding any OCM topic you find it complicated. And please post your comments on amazon and here on my blog regarding the book, Your feedback is highly appreciated!


ocm-book

Using deprecated ASM parameter might prevent your Cluster to start

$
0
0

Few days ago, I was testing some ASM parameters in my 3 nodes 12.2 Clusterware environment and used ASM_PREFERRED_READ_FAILURE_GROUPS parameter to see how I can force ASM to read specific failure group. Testings were successfull but I didn’t know that this parameter is deprecated in 12.2, and beside that, I didn’t imagine that it might cause me a downtime and prevent Clusterware to start.

Here’s the scenario that you can try in your test environment. First of all, I set this parameter to the failure group and then resetted it back:

SQL> alter system set ASM_PREFERRED_READ_FAILURE_GROUPS=”;

System altered.

SQL> 


Then I made some hardware changes to my nodes and rebooted them. After nodes are rebooted, I checked the status of the clusterware, and it was down at all nodes.


[oracle@oratest01 ~]$ crsctl check crs

CRS-4638: Oracle High Availability Services is online

CRS-4535: Cannot communicate with Cluster Ready Services

CRS-4529: Cluster Synchronization Services is online

CRS-4534: Cannot communicate with Event Manager


[oracle@oratest01 ~]$ crsctl check cluster -all

**************************************************************

oratest01:

CRS-4535: Cannot communicate with Cluster Ready Services

CRS-4529: Cluster Synchronization Services is online

CRS-4534: Cannot communicate with Event Manager

**************************************************************

oratest02:

CRS-4535: Cannot communicate with Cluster Ready Services

CRS-4530: Communications failure contacting Cluster Synchronization Services daemon

CRS-4534: Cannot communicate with Event Manager

**************************************************************

oratest03:

CRS-4535: Cannot communicate with Cluster Ready Services

CRS-4530: Communications failure contacting Cluster Synchronization Services daemon

CRS-4534: Cannot communicate with Event Manager

**************************************************************


Next, I check if ohasd and crsd background processes are up

[root@oratest01 oracle]# ps -ef|grep init.ohasd|grep -v grep

root      1252     1  0 02:49 ?        00:00:00 /bin/sh /etc/init.d/init.ohasd run >/dev/null 2>&1 </dev/null

[root@oratest01 oracle]#


[root@oratest01 oracle]# ps -ef|grep crsd|grep -v grep

[root@oratest01 oracle]#


OHAS was up and running, but CRSD not. ASM instance should be up in order to bring the crsd, so I checked if ASM instance is up, but it was also down:

[oracle@oratest01 ~]$ ps -ef | grep smon

oracle    5473  3299  0 02:50 pts/0    00:00:00 grep –color=auto smon

[oracle@oratest01 ~]$


Next, I decided to check log files. Logged in to adrci to find the centralized Clusterware log folder:


[oracle@oratest01 ~]$ adrci

ADRCI: Release 12.2.0.1.0 – Production on Fri Oct 20 02:51:59 2017

Copyright (c) 1982, 2017, Oracle and/or its affiliates.  All rights reserved.

ADR base = “/u01/app/oracle”

adrci> show home

ADR Homes:

diag/rdbms/_mgmtdb/-MGMTDB

diag/rdbms/proddb/proddb1

diag/asm/user_root/host_4288267646_107

diag/asm/user_oracle/host_4288267646_107

diag/asm/+asm/+ASM1

diag/crs/oratest01/crs

diag/clients/user_root/host_4288267646_107

diag/clients/user_oracle/host_4288267646_107

diag/tnslsnr/oratest01/asmnet1lsnr_asm

diag/tnslsnr/oratest01/listener_scan1

diag/tnslsnr/oratest01/listener_scan2

diag/tnslsnr/oratest01/listener_scan3

diag/tnslsnr/oratest01/listener

diag/tnslsnr/oratest01/mgmtlsnr

diag/asmtool/user_root/host_4288267646_107

diag/asmtool/user_oracle/host_4288267646_107

diag/apx/+apx/+APX1

diag/afdboot/user_root/host_4288267646_107

adrci> exit

[oracle@oratest01 ~]$ cd /u01/app/oracle/diag/crs/oratest01/crs

[oracle@oratest01 crs]$cd trace


[oracle@oratest01 trace]$ tail -f evmd.trc

2017-10-20 02:54:26.533 :  CRSOCR:2840602368:  OCR context init failure.  Error: PROC-32: Cluster Ready Services on the local node is not running Messaging error [gipcretConnectionRefused] [29]

2017-10-20 02:54:27.552 :  CRSOCR:2840602368:  OCR context init failure.  Error: PROC-32: Cluster Ready Services on the local node is not running Messaging error [gipcretConnectionRefused] [29]

2017-10-20 02:54:28.574 :  CRSOCR:2840602368:  OCR context init failure.  Error: PROC-32: Cluster Ready Services on the local node is not running Messaging error [gipcretConnectionRefused] [29]


From evmd.trc file it can bees that OCR was not initialized. Then I check alert.log file:


[oracle@oratest01 trace]$ tail -f alert.log

2017-10-20 02:49:49.613 [OCSSD(3825)]CRS-1605: CSSD voting file is online: AFD:DATA1; details in /u01/app/oracle/diag/crs/oratest01/crs/trace/ocssd.trc.

2017-10-20 02:49:49.627 [OCSSD(3825)]CRS-1672: The number of voting files currently available 1 has fallen to the minimum number of voting files required 1.

2017-10-20 02:49:58.812 [OCSSD(3825)]CRS-1601: CSSD Reconfiguration complete. Active nodes are oratest01 .

2017-10-20 02:50:01.154 [OCTSSD(5351)]CRS-8500: Oracle Clusterware OCTSSD process is starting with operating system process ID 5351

2017-10-20 02:50:01.161 [OCSSD(3825)]CRS-1720: Cluster Synchronization Services daemon (CSSD) is ready for operation.

2017-10-20 02:50:02.099 [OCTSSD(5351)]CRS-2403: The Cluster Time Synchronization Service on host oratest01 is in observer mode.

2017-10-20 02:50:03.233 [OCTSSD(5351)]CRS-2407: The new Cluster Time Synchronization Service reference node is host oratest01.

2017-10-20 02:50:03.235 [OCTSSD(5351)]CRS-2401: The Cluster Time Synchronization Service started on host oratest01.

2017-10-20 02:50:10.454 [ORAAGENT(3362)]CRS-5011: Check of resource “ora.asm” failed: details at “(:CLSN00006:)” in “/u01/app/oracle/diag/crs/oratest01/crs/trace/ohasd_oraagent_oracle.trc”

2017-10-20 02:50:18.692 [ORAROOTAGENT(3198)]CRS-5019: All OCR locations are on ASM disk groups [DATA], and none of these disk groups are mounted. Details are at “(:CLSN00140:)” in “/u01/app/oracle/diag/crs/oratest01/crs/trace/ohasd_orarootagent_root.trc”.


CRS didn’t started as the ASM is not up and running. To checking why ASM wasn’t started upon the server book sounded good starting point for the investigation, so logged in and tried to start ASM instance:


[oracle@oratest01 ~]$ sqlplus / as sysasm

SQL*Plus: Release 12.2.0.1.0 Production on Fri Oct 20 02:55:12 2017

Copyright (c) 1982, 2016, Oracle.  All rights reserved.

Connected to an idle instance.

SQL> startup

ORA-01078: failure in processing system parameters

SQL> startup

ORA-01078: failure in processing system parameters

SQL> startup

ORA-01078: failure in processing system parameters

SQL>


I checked ASM alert.log file, but it didn’t provide enough information why ASM didn’t start:

NOTE: ASM client -MGMTDB:_mgmtdb:clouddb disconnected unexpectedly.
NOTE: check client alert log.
NOTE: Trace records dumped in trace file /u01/app/oracle/diag/asm/+asm/+ASM1/trace/+ASM1_ufg_20658_-MGMTDB__mgmtdb.trc
NOTE: cleaned up ASM client -MGMTDB:_mgmtdb:clouddb connection state (reg:2993645709)
2017-10-20T02:47:20.588256-04:00
NOTE: client +APX1:+APX:clouddb deregistered
2017-10-20T02:47:21.201319-04:00
NOTE: detected orphaned client id 0x10004.
2017-10-20T02:48:49.613505-04:00
WARNING: Write Failed, will retry. group:2 disk:0 AU:9067 offset:151552 size:4096
path:AFD:DATA1
incarnation:0xf0a9ba5e synchronous result:’I/O error’
subsys:/opt/oracle/extapi/64/asm/orcl/1/libafd12.so krq:0x7f8fced52240 bufp:0x7f8fc9262000 osderr1:0xfffffff8 osderr2:0xc28
IO elapsed time: 0 usec Time waited on I/O: 0 usec
ERROR: unrecoverable error ORA-15311 raised in ASM I/O path; terminating process 20200


The problem seemed to be in the parameter file of ASM, so I decided to start it with default parameters and then investigate. For this, I opened searched for the string “parameters” in the ASM alert.log file to get list of parameters and paramter file location:

[oracle@oratest01 trace]$ more +ASM1_alert.log

Using parameter settings in server-side spfile +DATA/clouddb/ASMPARAMETERFILE/registry.253.949654249

System parameters with non-default values:

  large_pool_size          = 12M

  remote_login_passwordfile= “EXCLUSIVE”

  asm_diskstring           = “/dev/sd*”

  asm_diskstring           = “AFD:*”

  asm_diskgroups           = “NEW”

  asm_diskgroups           = “TESTDG”

  asm_power_limit          = 1

  _asm_max_connected_clients= 4

NOTE: remote asm mode is remote (mode 0x202; from cluster type)

2017-08-11T10:22:24.834431-04:00

Cluster Communication is configured to use IPs from: GPnP


Then I created parameter file (/tmp/pfile_asm.ora) and started the instance:

SQL> startup pfile=’/home/oracle/pfile_asm.ora’;

ASM instance started


Total System Global Area 1140850688 bytes

Fixed Size                                8629704 bytes

Variable Size                      1107055160 bytes

ASM Cache                            25165824 bytes

ASM diskgroups mounted

SQL> exit


Great! ASM is up. Now I can restore my parameter file and try to start ASM with it:


[oracle@oratest01 ~]$ sqlplus / as sysasm

SQL> create pfile=’/home/oracle/pfile_orig.ora’ from spfile=’+DATA/clouddb/ASMPARAMETERFILE/registry.253.957837377′;

File created.

SQL> 


And here is entry of my original ASM parameter file:

[oracle@oratest01 ~]$ more /home/oracle/pfile_orig.ora

+ASM1.__oracle_base=’/u01/app/oracle’#ORACLE_BASE set from in memory value

+ASM2.__oracle_base=’/u01/app/oracle’#ORACLE_BASE set from in memory value

+ASM3.__oracle_base=’/u01/app/oracle’#ORACLE_BASE set from in memory value

+ASM3._asm_max_connected_clients=5

+ASM2._asm_max_connected_clients=8

+ASM1._asm_max_connected_clients=5

*.asm_diskgroups=’DATA’,’ACFSDG’#Manual Mount

*.asm_diskstring=’/dev/sd*’,’AFD:*’

*.asm_power_limit=1

*.asm_preferred_read_failure_groups=”

*.large_pool_size=12M

*.remote_login_passwordfile=’EXCLUSIVE’


Good. Now let’s start ASM with it:

SQL> shut abort

ASM instance shutdown

SQL> startup pfile=’/home/oracle/pfile_orig.ora’;

ORA-32006: ASM_PREFERRED_READ_FAILURE_GROUPS initialization parameter has been deprecated


ORA-01078: failure in processing system parameters

SQL>


Wohoo. ASM failed to start because of deprecated parameter?! Let’s remove it and start ASM without ASM_PREFERRED_READ_FAILURE_GROUPS parameter:

[oracle@oratest01 ~]$ sqlplus / as sysasm

Connected to an idle instance.

SQL> startup pfile=’/home/oracle/pfile_orig.ora’;

ASM instance started


Total System Global Area 1140850688 bytes

Fixed Size                                8629704 bytes

Variable Size                      1107055160 bytes

ASM Cache                            25165824 bytes

ASM diskgroups mounted

SQL> 


It is started! Next I create ASM parameter file based on this pfile and start the instance:

SQL> create spfile=’+DATA’ from pfile=’/home/oracle/pfile_orig.ora’;

File created.


SQL> shut immediate

ASM diskgroups dismounted

ASM instance shutdown


SQL> startup

ASM instance started

Total System Global Area 1140850688 bytes

Fixed Size                                8629704 bytes

Variable Size                      1107055160 bytes

ASM Cache                            25165824 bytes

ASM diskgroups mounted

SQL> 


After having ASM up and running I restart the clusterware on all nodes and check the status:

[root@oratest01 ~]$  crsctl stop cluster –all

[root@oratest01 ~]$ crsctl start cluster –all

[oracle@oratest01 ~]$ crsctl check cluster -all

**************************************************************

oratest01:

CRS-4537: Cluster Ready Services is online

CRS-4529: Cluster Synchronization Services is online

CRS-4533: Event Manager is online

**************************************************************

CRS-4404: The following nodes did not reply within the allotted time:

oratest02, oratest03


The first node is up, but I wasn’t able to get status of clusterware in other nodes and got CRS-4404 error. To solve it, kill gpnpd process on all nodes and run the command again:


[oracle@oratest01 ~]$ ps -ef | grep gpn

oracle    3418     1  0 02:49 ?        00:00:15 /u01/app/12.2.0.1/grid/bin/gpnpd.bin

[oracle@oratest01 ~]$ kill -9 3418

[oracle@oratest01 ~]$ ps -ef | grep gpn

oracle   16169     1  3 06:52 ?        00:00:00 /u01/app/12.2.0.1/grid/bin/gpnpd.bin


[oracle@oratest01 ~]$ crsctl check cluster -all

**************************************************************

oratest01:

CRS-4537: Cluster Ready Services is online

CRS-4529: Cluster Synchronization Services is online

CRS-4533: Event Manager is online

**************************************************************

oratest02:

CRS-4537: Cluster Ready Services is online

CRS-4529: Cluster Synchronization Services is online

CRS-4533: Event Manager is online

**************************************************************

oratest03:

CRS-4537: Cluster Ready Services is online

CRS-4529: Cluster Synchronization Services is online

CRS-4533: Event Manager is online

**************************************************************

[oracle@oratest01 ~]$


From this blog post you can learn step by step clusterware startup troubleshooting and not to use depracated ASM parameter

How to pass Oracle Database 12c: RAC and Grid Infrastructure Administration exam – 1Z0-068 and become Oracle Certified Expert

$
0
0

In this post I will talk about my journey on how to prepare and pass the 12c RAC and Grid Administration exam.


About the exam

Check the following link to get more information about the exam from Oracle University page:

https://education.oracle.com/pls/web_prod-plq-dad/db_pages.getpage?page_id=5001&get_params=p_exam_id:1Z0-068


The exam consists of 3 parts:

– Oracle 12c ASM Administration
– Oracle 12c Grid Infrastructure Installation and Administration
– Oracle 12c RAC Administration


I don’t want to scare you, but the exam is hard enough. The bad thing is – you fail the entire exam if you fail one of the sections. This means that you have to be well prepared for all 3 parts. For me, I was good at ASM and RAC Administration, and was not comfortable with Grid Infrastructure Installation and Administration part which I passed barely.

You may be Oracle high availability expert and fail the exam. You might have an experience but can fail because of useless (or may be uncommon) features and topics that you didn’t practice, or didn’t read or read superficial. Because most of the questions were not checking your practical experience, but theoretical knowledge. I manage high available cluster databases for last 8 years, and it was really hard to answer some of the questions that I haven’t ever faced and I didn’t see the reason to try.
There were a lot of questions like “Choose four option, where blah blah blah ….” And you have to choose 4 options out of 7. You might know 3 correct answers, but because of that 1 wrong option you might fail.

Next, you have to achieve a minimum score for all 3 sections in order to pass the entire exam. You might complete 2 sections with 100% and fail from the one and end up failing the entire exam.


How to prepare for the exam?

You have to read the documentation and play with ASM, RAC database and Grid Infrastructure A LOT!

If you want to learn Oracle 12c Grid Infrastructure installation, check the following video tutorial:

http://www.oraclevideotutorials.com/video/installing-oracle-12cr2-grid-infrastructure


Check the videos section in oraclevideotutorials.com to find out some clusterware related hands-on practices:

http://www.oraclevideotutorials.com/videos


The only available book related with the exam (RAC part mostly) is the following book which is worth reading written by friends of mine Syed Jaffar, Kai Yu and Riyaj Shamsudden:

Expert Oracle RAC 12c
https://www.amazon.com/Expert-Oracle-RAC-Experts-Voice/dp/1430250445/


In my OCM preparation book, I have two chapters that can help you during the preparation:

Chapter 7 – Grid Infrastructure and ASM

Chapter 8 – Real Application Clusters.


To get free trial pdf copy of the book, go to www.ocmguide.com , or purchase it from the following link:

https://www.amazon.com/Oracle-Certified-Master-Exam-Guide/dp/1536800791/


During the exam, I felt regret skipping reading some chapters in the documentation and viewing some of them superficial. I highly recommend to check ASM, RAC and Grid Infrastructure documentation and make sure you went through the entire documentation at least once. Here are the links to the documentations:


Real Application Clusters Administration and Deployment Guide

https://docs.oracle.com/en/database/oracle/oracle-database/12.2/racad/toc.htm


Clusterware Administration and Deployment Guide

https://docs.oracle.com/en/database/oracle/oracle-database/12.2/cwadd/toc.htm


Automatic Storage Management Administrator’s Guide

https://docs.oracle.com/en/database/oracle/oracle-database/12.2/ostmg/toc.htm


Setting deadlines and booking the exam

Most of you (including me) postpone the exam and don’t put deadlines for the preparation and for the exam itself. My advice – set an approximate date for the exam and make a plan for each month, week and day. Then set a date and book the exam! Yes, book it – as you have a chance to rebook if you don’t feel ready unless it’s 24 hours before the exam. Registering for the exam weeks before the exam date will push you to make your preparation completed on time.


I booked the exam for Tuesday, rebooked it to Wednesday, then to Thursday, and then to Friday :). On Wednesday I decided to reschedule it to the next Monday and in the evening I was shocked when I saw that I didn’t actually rescheduled it on Friday. It will happen tomorrow! (on Thursday) Just in a few hours! :)


I didn’t feel that I’m ready and still having few incomplete sections where I was feeling weak, even was about to cancel the exam and don’t attend, but then decided to push hard and try. And if I lose, I decided to lose like a champ :)


So I stayed awake till 3am, took a nap till 6am and made last preparations till 9am. Attended exam at 10am and was completely exhausted, overworked and sleepy.

Fortunately I passed the exam successfully and wish you the same.

O_CertExpert_ODatabase12cORACandOGridInfrastructureAdmin_clr


This is my experience with Oracle Database 12c: RAC and Grid Infrastructure Administration exam  (1Z0-068).  Let me know if you plan to take the exam, so I guide you through it in more detail.

Good luck!

The most horrific Oracle messages you might get in the production database – or – why DBAs get older

$
0
0

If you are a production DBA of mission critical system, then you might have already seen the following critical, I would say mortal messages in your alert.log file.

  • When your database was up and running, you shutdown it and open and it fails to MOUNT the database and abort

image_1


  • The database was hanged with millions of online transactions, and aborted. You start the instance, switch to the MOUNT mode, do some maintenance tasks and try to open the database and …. wait …. wait …. wait …..

image_2


  • system01.dbf contains corrupted blocks


Image_3


  • When it takes 15 hours to restore the database, you run the recover database command and get the following errors:

image_4


  • When you’ve done with restore/recover and open the database with RESETLOGS option and see the following errors:


Image_5


  • When you have missing datafiles of a tablespace with 10Tb size due to hard disk corruption and don’t have a backup

image_6


  • Incomplete recovery due to missing archived log files and most probably you are going to fail using *.allow_resetlogs_corruption parameter as well


Image_7


  • When your database hangs, you get a hard disk corruption and lose some datafiles, and it takes an hour and half to perform and instance recovery and you just wait for that time of period for the database to be opened:


Image_8


  • Aaaand most annoying message during the recovery


Image_9


I will keep updating this post with your and my screenshots. Feel free to send me screenshot of cases where you stressed, but eventually succeeded to solve the database issue

Download and install Oracle Database 18c – NOW!

$
0
0

Most of you already have seen that Oracle Database 18c has been already released. If you haven’t downloaded and installed it yet, let’s do it!

First of all, check the following address and download the installation of Oracle Database 18c:

http://www.oracle.com/technetwork/database/enterprise-edition/downloads/oracle18c-linux-180000-5022980.html

If you want to download it from the host itself, you can use wget by providing username, password and the installation zip file as follows:

wget –http-user=YOUR_USERNAME –http-password=YOUR_PASSWORD –no-check-certificate –output-document=LINUX.X64_180000_db_home.zip “https://download.oracle.com/otn/linux/oracle18c/180000/LINUX.X64_180000_db_home.zip”

If you want to get more information on this technique, check the following metalink note:

Using WGET to download My Oracle Support Patches (Doc ID 980924.1)


Next, unzip the file and run ./runInstaller :

Capture1


Choose the first option and click Next:

Capture2


If you don’t want to choose the components and configure the advanced options, choose “Desktop class” and click Next:

Capture3


Provide the Oracle Base and database file locations, database name and the SYS password and click Next


Capture4


Check the summary information and click Install


Capture5


Installation (actually relinkin) will proceed and you will be asked to run the root.sh script with the root user. Run it and click Ok to proceed


Capture6


The installation will create a database, provide the OEM page and finishes.

Click close, switch to the terminal, login to the database and start getting your hands dirty with Oracle 18c!

Capture7


In the next posts, I will share 18c new featuers with practical use cases. Good Luck!


ODev Yathra Tour 2018 – discovering Incredible India

$
0
0

Last month, after long brainstorm, I decided to take my chance and accepted my participation at Indian Oracle ODev Yathra tour. Despite the fact that I’ve visited India (Hyderabad) 2 times in the past for the Sangam conferences, I wanted to discover India more and decided to take 4 cities out of 7.

For the Yathra Tour I submitted 2 papers:

The first one was about “8 ways to migrate your On-Premis database to Oracle Cloud” where I was talking about different ways to migrate the database based on the downtime and the migration requirements to the Oracle Cloud.

The second session “Create, configure and manage Disaster Recovery in Oracle Cloud for On-Premises database” was about creating, configuring and managing DR on the Oracle Cloud using different techniques as well as configuring high level database, backup and network security.

When the agenda was published, I got a lot of messages from the DBAs of the cities at which I was not supposed to participate – that they are looking forward to meet me. So I talked to Sai Ram, the organizer of the Yathra Tour and he managed to put me into the agenda of the rest cities and I accepted one of the hardest decisions of my life and took all cities. I was having (and still have) a lot of ongoing projects in my company and had health issues that were blocking me to travel a long distance for two weeks. But I decided to push my limits and go beyond it.

So, finally, the travel started. I took my first flight to Abu Dhabi, and from Abu Dhabi to Chennai. Landed in Chennai, took a cab to the hotel, have some rest and was in the lobby at 7.30 AM next morning. Yes, this time was the common checkout time from the hotel every day :) I met Oracle Fusion expert Basheer Khan, Machine Learning PM Sandesh, Exadata PM Gurmit in the morning and we had a breakfast together. Then we took a cab and went to the venue.

Chennai_1Chennai_2Chennai_3


So the daily routine for the conference was 7.30AM checkout from the hotel, cab drive to the venue, registration, introduction speech of Sai and other AIOUG members, then delivering presentations, having launch (most of the time spicy Indian launch :) ), closing ceremony at 6.00PM, driving to the airport, flying to the next city, bunch of security checks and etc., driving to the hotel, check-in and off to bed at 1.00AM and then checkout at 7.30 AM and off to the next venue again. Scary, right? :)

The next city was Bengaluru. As we had one extra day there, I decided to have a lunch outside in a random restaurant. The place was near the hotel and I ordered biryani as always :) Although I asked for “less spicy” biryani, I was served with the spicy one. My tongue was burned out and I was hardly drinking the tea for the next 2 days :) But it was very delicious. In the evening I took a small trip to MG (Mahatma Gandhi) road. It was too crowded, fascinating place and I was hardly got rid of a man who was chasing me and trying to sell a chess for 1500 Rupes (which originally was for 600 Rupee) :) He didn’t know I train JiuJitsu :)

Bengaluru_1Bengaluru_2


The next city was Ahmedabad. And I was not the only person who was visiting this city for the first time. Actually none of us (mostly Indian speakers) visited Ahmedabad so far :) The roads of this city were wide, and I was told that the Ahmadabad guys are coolest guys in India )) My session was after the launch and I managed to sleep a little bit more and attended the venue later. But unfortunately didn’t manage to visit the barber in the open air whom I was filming with curiosity. He yelled me with his hand and invited me to try his service, but I was late to my session


Ahmedabad_1 Ahmedabad_2


Next city was Hyderabad and the airport was very familiar to me. I already visited Hyderabad 2 times before. Again, was fortunate to have only one session after the launch and attended the venue a little bit later, met lot of friends that I met in my previous visits and all of us were off to the airport right after the conference.


Hyderabad_1 Hyderabad_2


And we headed to the Pune. I was happy, because we had an extra day in Pune. We arrived to the city in the evening, and the next day after having launch in the hotel, I missed city tour with speakers who were more energized than me :) and found a Starbucks coffee shop and spend few hours reading book (Ikigai – Japanese concept that means “a reason for being.”)  and relaxed a lot. The next day, we checked out from the hotel early in the morning and went to the Oracle office that was bit far from the hotel, and fortunately did a city tour in parallel )) The venue was huge and beautiful and there was a coffee machine that I used a lot to drink a coffee to stay alive. We had a very interactive sessions and after the conference the bus was waiting for us to take us to the Mumbai! It took approximately 4 hours for us to reach to Mumbai, but we enjoyed the travel a lot. In the following link you can see part of our trip in Connor’s video shoot :)

https://www.youtube.com/watch?v=eUkQqj6oDZw


Pune1 Pune_2


Mumbai meetup was awesome. I got more questions in just a single session than the rest of the tour J and it ended up finishing the 45 minute session in 1.30 hour! But it was not just a presentation, because of those questions the session was like a discussion which I liked a lot!

Mumbai_1 Mumbai_2


And after the conference, we headed to airport to take the last city – Gurgaon! The next morning I was extremely tired, barely was walking and standing straight. But got a lot of positive energy from the attendees and did 2 sessions successfully. As my flight was on the next day at 4.00 AM, I returned back to the hotel, had some rest and headed to the airport and returned back to my lovely country, Azerbaijan.


Gurgaon_1 Gurgaon_2 Gurgaon_3


So overall, the trip was awesome! It was hard, but it was worth it. I made a new friendships, met online friends that were using my blog posts for years and got a lot of positive feedback, listened stories about how my blog posts saved their lives and etc. :) and it motivated me to write more blog posts in the future. I also attended sessions of other speakers and learned a lot both in terms of presentations and technical skills

I would like to thank to the ODev Yathra Tour organizers, especially Sai Ram for all he had done to make us feel like home, to AIOUG staff, to ACE program – especially Jennifer and Lori for supporting us, to all attendees for taking time and attending our sessions. I love India and the community a lot and looking forward to visit the amazing and incredible India again!

PRCR-1079 : Failed to start resource oranode1-vip. CRS-2680 Clean failed. CRS-5804: Communication error with agent process

$
0
0

Last week we had a clusterware issue on one of the critical 3 node RAC environment. In the first node, network resource is restarted by ending up killing all sessions on that node abnormally. Oracle VIP that was running on that node failed over to the third node. The first node was up and running, but didn’t accept connections because it was trying to register the instance using LOCAL_LISTENER parameter where the oranode1-vip was specified that was not running on that node. We tried to relocate it back to the first node, but it failed because it couldn’t stop it. Everytime we tried to stop or relocate it, the cleaning process started and failed in a few minutes.

Neither support, nor us didn’t find any readable information in the clusterware log files. Despite the fact that there were 2 instance up and running, as load was so high, they were barely handle all connections. The ping succeeded to the oranode1-vip, but it wasn’t able to stop it even with force mode. We couldn’t able to start it as well, because it didn’t stop successfully and wasn’t able to clean up successfully. The status was “enabled” and “not running”, but ping was ok

db-bash-$ srvctl status vip -i oranode1-vip
VIP oranode1-vip is enabled 
VIP oranode1-vip is not running 
db-bash-$

From crsctl stat res command we could see that it’s OFFLINE and failed over to the node3


db-bash-$ crsctl stat res -t
oranode1-vip  1 OFFLINE UNKNOWN node03


And it failed when we tried to start it:

db-bash-$ srvctl start vip -i oranode1-vip   
PRCR-1079 : Failed to start resource oranode1-vip  
CRS-2680: Clean of 'oranode1-vip  ' on 'node03' failed 
CRS-5804: Communication error with agent process


We cleared socket files of the first node from /var/tmp/.oracle folder, restart the CRS and checked if it failed back, but it didn’t. Support asked us to stop the second node, clear the socket files and start it to see if something changed, but we didn’t do it, because the single node wouldn’t be able to handle all connections.

At the end, we checked the interface of virtual up on OS level, and found it on node03

db-bash-$ netstat -win
lan900:805 1500 #### #### 2481604 0 51 0 0


Instead of restarting the CRS of production database (which takes 10 minutes), we decided to bring that interface down using on OS level. For HP-UX, it’s ifconfig … down command

Before running this command on production environment, we tried it on the test environment and realized that the down parameter is not enough. We have to provide 0.0.0.0 ip address with along the down parameter to bring down that interface. So we run the following command to bring it down:

ifconfig lan900:805 0.0.0.0 down

And it disappeared from the list. Next, we started the vip using srvctl start vip command and it succeeded!

Lessons learned:

  • Perform all actions on the test environment (if you are not sure what can happen) before trying it on production environment
  • Don’t try to “restart” or “reboot” the instance, cluster or the node. Sometimes it just doesn’t solve your problem. Even after restart, the system can’t startup correctly (because of changed parameters, configurations and etc.)
  • In 24 hours, severity #1 SR was assigned to 6 different engineers. It takes a lot of time to gather log files, submit them and have it reviewed by Oracle engineer until his/her shift is changed. Sometimes you just don’t have time to get answer from Oracle, you have to do it by your own and take all risks. It requires an experience.

Second OCM exam is cleared. New book and online course are on the way

$
0
0

2 months ago after a long preparation I decided to upgrade my OCM certification and registered for the exam in Shanghai. Few years ago when I cleared 10g OCM exam I started my preparations for the upgrade right away. I did a lot of research and practical hands-ons and then thought it would be great if I can collect everything what I have in a single book. It took almost 2 years for me to publish the book. Few months after the book was published, I started getting emails from the readers on how the book helped them during their preparations and was happy to see them passing the exam! Having a lot of different projects during those days, I didn’t manage to take the exam. And unfortunately 11g OCM 1 day exam was retired. It means that I was supposed to take another 2 days exam again! But it was ok. If this is the only option, then I have nothing to do.

I will not talk about how my travel was hard, but eventually the exam day has arrived. It was 9 sections (2 days) with lot of different practical tasks. I wouldn’t also like to go in more details regarding the questions and so on, but what I realized was that the book that I’ve published even before taking the  OCM 11g exam was covering almost everything that I had during the exam 😊 Reviewing topics directly from my book helped me to be confident during the exam.

Few weeks passed, and I got a happy email from Oracle – that I’ve passed the exam and became 2xOCM. Now it’s time for the third and last one )) And it means that I’ve already started my preparation with along the new book which will be published in a few months.

For those of you guys who want to clear the OCM 11g exam, believe it or not, my book covers almost all the topics. And after clearing the second OCM exam, I decided to start an online course and help you on your preparation individually. So keep tuned and I will announce the course information shortly 😊

OCM 11g Certificate

Connect to Oracle from Python – write your first Python script!

$
0
0

Python is getting more popular nowadays, because it is reliable and efficient, it has great corporate sponsors, and because of it’s amazing libraries that helps you to save time during the initial development cycle.

It’s much more easy to connect to an Oracle Database from Python by using cx_Oracle module. To get more information about cx_Oracle module, check the following links:

https://oracle.github.io/python-cx_Oracle/ 

https://cx-oracle.readthedocs.io/en/latest/installation.html


In this blog post, I will show how to install Python and configure the environment and connect to the database.

First of all, make sure you’ve an internet connection and install Python with yum as follows:

yum install python

After python is installed, install easy_install on Linux in order to download and manage Python packages easily using the following command:

wget http://bootstrap.pypa.io/ez_setup.py -O -| sudo python

easy_install installation

Next install pip using easy_install as follows:

pip_installation

Now install cx_Oracle module using pip as follows:

install_cx_Oracle_using_pip


Now install Oracle instant client:

cd /etc/yum.repos.d
wget https://yum.oracle.com/public-yum-ol7.repo
yum install -y yum-utils
yum-config-manager --enable ol7_oracle_instantclient
yum list oracle-instantclient*

yum_list_oracle_instantclient


Now install Oracle instance client basic and sqlplus as follows:

yum_install_oracle_instantclient


After installing Oracle client, configure environment variables as follows:

vi .bashrc
export CLIENT_HOME=/usr/lib/oracle/18.3/client64
export LD_LIBRARY_PATH=$CLIENT_HOME/lib
export PATH=$PATH:$CLIENT_HOME/bin


run .basrhc file to set environment variables and write your first Python script as follows:

vi connect.py 
import cx_Oracle
con=cx_Oracle.connect('username/password@ip_address/service_name')
print con.version
con.close()


If we run this script, we will get Oracle Database version in the output:

[root@oratest ~]python connect.py
11.2.0.4.0
[root@oratest ~]


Now let’s use split function in Python and split the version into “Version, Release and Patchset” sections as follows:

import cx_Oracle
con=cx_Oracle.connect('username/password@ip_address/service_name')
ver=con.version.split(".")
print 'Version:', ver[0],'\nRelease:',ver[1],'\nPatchset:',ver[3]
con.close()

[root@oratest ~]python connect.py
Version: 11
Release: 2
Patchste: 4
[root@oratest ~]


Now let’s create a table in Oracle and write a simple python code to query and print all rows in the table:

SQL> create table test_table(id number, name varchar2(10));
Table created.
SQL> insert into test_table values(1,'Oracle DB');
1 row created.
SQL> insert into test_table values(2,'SQL');
1 row created.
SQL> insert into test_table values(3,'PL/SQL');
1 row created.
SQL>


Now create a python code to query the table:

import cx_Oracle
con=cx_Oracle.connect('username/password@ip_address/service_name')
cur=con.cursor()
cur.execute('select * from test_table order by 1')
for result in cur:
      print result
cur.close()
con.close()


[root@oratest ~]python connect.py
(1,'Oracle DB')
(2,'SQL')
(3,'PL/SQL')
[root@oratest ~]

Congratulations! You’ve installed/configured Python, connected to an Oracle database, queried the table and printed the output!

Solution for ORA-27154: post/wait create failed ; ORA-27302: failure occurred at: sskgpbitsper

$
0
0

Today, while creating an empty database in Exadata machine where there was enough free space and memory, we got the following error:

SYS@TEST> startup nomount
ORA-27154: post/wait create failed
ORA-27300: OS system dependent operation:semget failed with status: 28
ORA-27301: OS failure message: No space left on device
ORA-27302: failure occurred at: sskgpbitsper


The problem wasn’t related with the space at all, even from the error message we see “No space left on device”.

From the error output, I realized “OS system dependent operation:semget“, where “sem” means “semaphore“. Having enough free memory and space, the process couldn’t allocate necessary semaphore, either because of the kernel parameter wasn’t configured correctly, or all memory is occupied. To get information about semaphores and shared memory, I ran ipcs command:

[oracle@node2~]$ ipcs
------ Shared Memory Segments --------
key shmid owner perms bytes nattch status 
0x00000000 0 root 644 64 2 dest 
0x00000000 32769 root 644 16384 2 dest 
0x00000000 65538 root 644 280 2 dest 
0x00000000 98307 root 644 80 2 
0x00000000 131076 root 644 16384 2 
0x00000000 163845 root 644 280 2 
0x00000000 262602758 oracle 640 4096 0
------ Semaphore Arrays --------
key semid owner perms nsems 
0x61000625 98306 root 666 1 
0x00000000 163844 root 666 3 
0x00000000 1769477 root 666 3 
0x00000000 4096006 root 666 3 
0xd9942a14 3604487 oracle 600 514 
0xd9942a15 3637256 oracle 600 514 
0xd9942a16 3670025 oracle 600 514 
0x192b36e8 219578379 oracle 640 1004 
0x5f94bc50 6062092 oracle 640 1004 
0x00000000 286752781 root 666 3 
0xaa3762f4 6324238 oracle 640 154


The list was long, so I decided to count the rows

[oracle@node2 ~]$ ipcs -s | wc -l
256


So overall I have 256 semaphores allocated. Then I checked /etc/sysctl.conf file for the KERNEL.SEM parameter:

[oracle@node2 ~]$ more /etc/sysctl.conf | grep sem
kernel.sem = 1024 60000 1024 256
[oracle@node2 ~]$

You can get more detailed output from ipcs -ls command as follows:


[oracle@node2 ~]$ ipcs -ls
------ Semaphore Limits --------
max number of arrays = 256
max semaphores per array = 1024
max semaphores system wide = 60000
max ops per semop call = 1024
semaphore max value = 32767


The last column indicates the maximum number of semaphore sets for the entire OS. In this case you have to options to solve the problem:

  • Increase the max number of arrays parameter in the /etc/sysctl.conf file
  • Remove unnecessary semaphores


Increasing max number of arrays parameter is the easiest (and the fastest) way. Here how it works:


1. Get the value for the SEM parameter:

[root@node2 ~]# cat /etc/sysctl.conf | grep sem
kernel.sem = 1024 60000 1024 256
[root@node2 ~]#

2. Edit it and change it to 260 (more than the value you get from ” ipcs -s | wc -l” command) and run the following command to set the parameter to be persistent

/sbin/sysctl -p

3. Create a dummy parameter file and start the instance in NOMOUNT mode to see if the oracle user can get a semaphore from the memory:

[oracle@node2 dbs] mode initTEST.ora
db_name=TEST
sga_size=2g


[oracle@node2 ~] export ORACLE_SID=TEST
[oracle@node2 ~] sqlplus / as sysdba
SYS@TEST> startup nomount
ORACLE instance started.
Total System Global Area 2137886720 bytes
Fixed Size 2254952 bytes
Variable Size 956303256 bytes
Database Buffers 1090519040 bytes
Redo Buffers 88809472 bytes
SYS@TEST>


It worked!


The second option to solve the problem, is to find out the ‘aged’ semaphores from the memory and remove them. Each semaphore is linked to the PID in the OS. In the following example I have overall 256 semaphores where 23 of them are related with oracle user (db instances etc.) and 229 of them related with root user. Most processes that hold the semaphore in the memory died long time ago, but semaphores didn’t age out. To find and kill the PID of the semaphore, we run ipcs command with -i parameter. First let’s get list of semaphores under oracle user and check one of them as follows:

[root@node2 ~]# ipcs -s | grep oracle 
0xcfe88130 3473414 oracle 600 514 
0xcfe88131 3506183 oracle 600 514 
0xcfe88132 3538952 oracle 600 514 
0xf0720010 411041803 oracle 640 802 
0xf8121f34 145653772 oracle 640 1004 
0xf0720011 411074573 oracle 640 802 
0xf0720012 411107342 oracle 640 802 
0xc5d91710 196444189 oracle 640 504 
0x86d48ae8 44236836 oracle 640 304 
0x67556608 199786542 oracle 640 876 
0x67556609 199819311 oracle 640 876 
0x6755660a 199852080 oracle 640 876 
0x6755660b 199884849 oracle 640 876 
0x6755660c 199917618 oracle 640 876 
0x806b87cc 157450352 oracle 640 752 
0x806b87cd 157483121 oracle 640 752 
0x806b87ce 157515892 oracle 640 752 
[root@node2 ~]#


Next, we run ipcs command with -i parameter to get the list of PIDs as follows:

[root@node2 ~]# ipcs -s -i 157450352 | more

Semaphore Array semid=157450352
uid=1001 gid=1002 cuid=1001 cgid=1002
mode=0640, access_perms=0640
nsems = 752
otime = Fri Jun 21 18:51:23 2019 
ctime = Fri Jun 21 18:51:23 2019 
semnum value ncount zcount pid 
0 1 0 0 315611 
1 4893 0 0 315611 
2 10236 0 0 315611 
3 32760 0 0 315611 
4 0 0 0 0 
5 0 0 0 0 
6 0 0 0 315729 
7 0 1 0 315731 
8 0 0 0 0 
9 0 1 0 315739 
10 0 0 0 0 
11 0 1 0 315743 
12 0 0 0 315745 
13 0 1 0 315747 
14 0 1 0 315749


Next, we run ps command and check the PID:

[root@node2 ~]# ps -fp 315729
UID PID PPID C STIME TTY TIME CMD
oracle 315729 1 0 2018 ? 01:14:13 ora_pmon_SNEWDB
[root@node2 ~]#


As you see, we found out that the specific semaphore is associated with the database instance. Now let’s repeat the same steps for the semaphores of the root user:

[oracle@node2 ~]$ ipcs -s |grep root
0x61000625 98306 root 666 1
0x00000000 163844 root 666 3
0x00000000 1769477 root 666 3
0x00000000 4096006 root 666 3
0x00000000 248774666 root 666 3
0x00000000 286752781 root 666 3
0x00000000 6357007 root 666 3


Now we run ipcs -s -i command for the semaphore which is marked in bold to find the PID :

[oracle@node2 ~]$ ipcs -s -i 248774666
Semaphore Array semid=248774666
uid=0 gid=11140 cuid=0 cgid=11140
mode=0666, access_perms=0666
nsems = 3
otime = Sun Dec 16 18:34:22 2018
ctime = Sun Dec 16 18:34:22 2018
semnum value ncount zcount pid
0 1024 0 0 156155
1 32000 0 0 156155
2 0 0 0 156155


If we check the PID in the system, we see that it’s not available:

[oracle@node2 ~]$ ps -fp 156155
UID PID PPID C STIME TTY TIME CMD
[oracle@node2 ~]$


Now we can safely remove that semaphore from the memory using ipcrm command in order to release space for new semaphores:

[root@node2 ~]# ipcrm -s 248774666
[root@node2 ~]#
Let's check if it was removed:
[root@node2 ~]# ipcrm -s 248774666
ipcrm: invalid id (248774666)
[root@node2 ~]#


As you see, we found out the semaphores which associated process is not available in the system, and removed it to make space for new semaphores. Now let’s start the instance:

SYS@TEST> startup nomount
ORACLE instance started.
Total System Global Area 2137886720 bytes
Fixed Size 2254952 bytes
Variable Size 956303256 bytes
Database Buffers 1090519040 bytes
Redo Buffers 88809472 bytes
SYS@TEST>


Exadata storage cell rolling restart caused datafile and redo log file header block corruptions

$
0
0

24 hours passed – still at work. Struggling to start up the database which was corrupted during cell storage rolling restart procedure. And I’ve never seen some Oracle error messages that I saw today. So here what is happened:


################
Exadata storage cell failure during so-called “rolling cell storage restart”. Data file headers are corrupted for some files just because of rolling restart of storage cells and it can’t read the mirror file in the normal redundancy diskgroup as well!!! Both are corrupted! SR created – but there’s no reply!
################


Read of datafile '+###1/###i/datafile/###_6077.1015929889' (fno 1367) header failed with ORA-01208
 Rereading datafile 1367 header from mirror side 'DA1_CD_05_CELADM02' failed with ORA-01208
 Errors in file /u01/app/oracle/diag/rdbms/###i/###I_2/trace/###I_2_ckpt_360497.trc:
 ORA-63999: data file suffered media failure
 ORA-01122: database file 1367 failed verification check
 ORA-01110: data file 1367: '+DATAC1/###i/datafile/###.6077.1015929889'
 ORA-01208: data file is an old version - not accessing current version


################
Instance terminated in both RAC nodes!
################


License high water mark = 107
 Instance terminated by CKPT, pid = 360497
 USER (ospid: 173989): terminating the instance
 Instance terminated by USER, pid = 173989


################
Instance can’t be opened and media recovery is required!
################


Abort recovery for domain 0
 Errors in file /u01/app/oracle/diag/rdbms/###i/###I_2/trace/###I_2_ora_175176.trc:
 ORA-01113: file 10 needs media recovery
 ORA-01110: data file 10: '+DATAC1/###i/datafile/###_4932.1028366333'
 ORA-1113 signalled during: ALTER DATABASE OPEN /* db agent *//* {0:3:84} */...
 NOTE: Deferred communication with ASM instance
 NOTE: deferred map free for map id 1127
 Fri Feb 07 16:27:06 2020
 License high water mark = 1
 USER (ospid: 175310): terminating the instance
 Instance terminated by USER, pid = 175310


################
Datafiles are corrupted!
################


Abort recovery for domain 0
 Errors in file /u01/app/oracle/diag/rdbms/###i/###I_2/trace/###I_2_ora_75964.trc:
 ORA-01122: database file 410 failed verification check
 ORA-01110: data file 410: '+DATAC1/###i/datafile/###_5420.1007284567'
 ORA-01207: file is more recent than control file - old control file
 ORA-1122 signalled during: alter database open...


################
OMG! I didn’t do anything? Tried to restore some datafiles from backup and recover them. V$RECOVERY_FILE is empty now. Tried to start the database:
################


Abort recovery for domain 0
 Aborting crash recovery due to error 742
 Errors in file /u01/app/oracle/diag/rdbms/###i/###I_2/trace/###I_2_ora_75964.trc:
 ORA-00742: Log read detects lost write in thread %d sequence %d block %d
 ORA-00312: online log 4 thread 1: '+DATAC1/###i/onlinelog/group_4.961.997203859'
 Abort recovery for domain 0
 Errors in file /u01/app/oracle/diag/rdbms/###i/###I_2/trace/###I_2_ora_75964.trc:
 ORA-00742: Log read detects lost write in thread %d sequence %d block %d
 ORA-00312: online log 4 thread 1: '+DATAC1/###i/onlinelog/group_4.961.997203859'
 ORA-742 signalled during: alter database open...


################
This is the first time ever I see “Log read detects lost write” message! It means LGWR thinks that the changes are written to the redo log files, but they are not! Meanwhile, SR 1 was created 2 hours ago – no response from Oracle! After an investigation we detected that the CURRENT logfile is corrupted which reside in the normal redundancy disk group! Oracle support guy replied to SR to run “recover database until cancel” command :) Then the second guy came in and said don’t try this :)
################
################
During datafile restore, the first block (which is header) seemed to be corrupted in both ASM allocaiton units in different disks (cells) !!!
################


computed block checksum: 0x0
 Reading datafile '+DATAC1/###i/datafile/###899.1007892167' for corruption at rdba: 0x67400001 (file 413, block 1)
 Read datafile mirror 'DAC1_CD_07_CELADM02' (file 413, block 1) found same corrupt data (no logical check)
 Read datafile mirror 'DAC1_CD_02_CELADM01' (file 413, block 1) found same corrupt data (no logical check)
 Hex dump of (file 414, block 1) in trace file /u01/app/oracle/diag/rdbms/###i/###I_2/trace/###I_2_ora_122826.trc
 Corrupt block relative dba: 0x67800001 (file 414, block 1)
 Bad header found during kcvxfh v8

################
Started restoring from backup (20TB) to the different machine. Seems to be the only way to restore the service. Andddd ….. Recovery interrupted!
################


Errors with log /backup1/###I/ARCH/thread_2_seq_1169.14245.1031731123
 Errors in file /u01/app/oracle/diag/rdbms/###i/###I_1/trace/###I_1_pr00_81255.trc:
 ORA-00310: archived log contains sequence 1169; sequence 1160 required
 ORA-00334: archived log: '/backup1/###I/ARCH/thread_2_seq_1169.14245.1031731123'
 ORA-310 signalled during: ALTER DATABASE RECOVER LOGFILE '/backup1/###I/ARCH/thread_2_seq_1169.14245.1031731123' ...
 ALTER DATABASE RECOVER CANCEL
 Signalling error 1152 for datafile 2!


################
RMAN is looking for the archived log file that was backed up and deleted in the beginning of the backup and wasn’t restored.
Aaaaandddddd …….. “OPEN RESETLOGS would get error” message! Are you kidding me?
################


Errors in file /u01/app/oracle/diag/rdbms/###i/###I_1/trace/###I_1_pr00_81255.trc:
 ORA-01547: warning: RECOVER succeeded but OPEN RESETLOGS would get error below
 ORA-01152: file 2 was not restored from a sufficiently old backup
 ORA-01110: data file 2: '+DATAC1/###i/datafile/sysaux.2948.1031790467'
 ORA-1547 signalled during: ALTER DATABASE RECOVER CANCEL ...


################
Cataloged some missing backup files, restored required archived log files and the recovery proceeded. But we got another error!
################


File #142 added to control file as 'UNNAMED00142'. Originally created as:
 '+DATAC1/###i/datafile/###_2020_idx.797.1031737697'
 Errors with log /backup2/###I/ARCH/thread_2_seq_1176.9418.1031737965
 Recovery interrupted!
 Recovery stopped due to failure in applying recovery marker (opcode 17.30).
 Datafiles are recovered to a consistent state at change 8534770504316 but controlfile could be ahead of datafiles.
 Media Recovery failed with error 1244
 Errors in file /u01/app/oracle/diag/rdbms/###i/###I_1/trace/###I_1_pr00_323548.trc:
 ORA-00283: recovery session canceled due to errors
 ORA-01244: unnamed datafile(s) added to control file by media recovery
 ORA-01110: data file 142: '+DATAC1/###i/datafile/###797.1031737697'


################
Some datafiles were added after the last controlfile backup (and controlfile auto backup was not enabled) and those datafiles are created with UNNAMED name. Renamed datafiles and started the recovery again
################

At the end, opened database successfully. Changed 4 different support engineers, some of them seemed junior for me. They just copied some steps from metalink notes and sent to me. The reason is still under investigation

Investigation on why database doesn’t start after successfully dropping a diskgroup

$
0
0

Few months ago, while performing storage migration I faced an interesting issue which could lead to potential downtime if I didn’t notice a hidden warning in the log file.

The plan was to create a new ASM diskgroup in a normal redundancy with 2 disks from different storages and test the disk crash and confirm that there will be no data loss if one of the storages fail. After creating a diskgroup, creating a test tablespaces on it and corrupting the header of one disks, everything was ok and we decided to drop the diskgroup and start adding new disks as a failgroup to other diskgroups.


Below I created a scenario in my test environment which describes the same problem.

  • First of all, I get location of controlfiles and datafiles (of course redo log files as well) to make sure which diskgroups contain physical files:


SQL> show parameter control
NAME                                                        TYPE VALUE
------------------------------------ ----------- ------------------------------
control_files                                            string               +CFILE2/TESTDB/CONTROLFILE/current.256.1046097231

SQL> select name from v$datafile;
NAME
--------------------------------------------------------------------------------
+DATA/TESTDB/DATAFILE/system.278.1046088963
+DATA/TESTDB/DATAFILE/sysaux.277.1046088795
+DATA/TESTDB/DATAFILE/undotbs1.280.1046089213
+DATA/TESTDB/DATAFILE/undotbs2.288.1046089391
+DATA/TESTDB/DATAFILE/users.279.1046089209
SQL>


As you see, we have 2 diskgroups involved: +CFILE2 and +DATA. Next, I run srvctl config database command and grep list of Diskgroups which are used by this database. We see the same output – +CFILE2 and +DATA


-bash-4.1$ srvctl config database -d testdb | grep Disk
Disk Groups: DATA,CFILE2
-bash-4.1$


  • Next, I query V$ASM_DISKGROUP view to get list of all diskgroups that are available in ASM:
SQL> col name format a40
SQL> set linesize 150


SQL> select group_number, name, state, type, total_mb, free_mb from v$asm_diskgroup;
GROUP_NUMBER NAME                                                                    STATE               TYPE       TOTAL_MB    FREE_MB
------------ ---------------------------------------- ----------- ------ ---------- ----------
                   4 TESTDG                                                               MOUNTED     EXTERN       1019                923
                   3 DATA                                                                    CONNECTED   EXTERN      15342             8239
                   1 CFILE2                                                                  CONNECTED   EXTERN       1019                892
SQL>


  • We have three diskroups – +CFILE2, +DATA and +TESTDG. Next, I will create a new tablespace in the diskgroup +TESTDG to have it become a part of the database configuration:


SQL> create tablespace mytbs datafile '+TESTDG' size 10m;
Tablespace created.
SQL>


  • Once I create a tablespace in the new diskgroup, it will be part of the database configuration and dependency is established between the database and the diskgroup which can be seen from the output of the alert.log file of the database:


Alert.log file
Wed Jul 29 09:02:47 2020
create tablespace mytbs datafile '+TESTDG' size 10m
Wed Jul 29 09:02:48 2020
NOTE: ASMB mounting group 4 (TESTDG)
NOTE: Assigning number (4,0) to disk (/dev/asm-disk5)
SUCCESS: mounted group 4 (TESTDG)
NOTE: grp 4 disk 0: TESTDG_0000 path:/dev/asm-disk5
Wed Jul 29 09:02:50 2020
NOTE: dependency between database testdb and diskgroup resource ora.TESTDG.dg is established
Completed: create tablespace mytbs datafile '+TESTDG' size 10m


  • Output of the ASM alert.log file:


Wed Jul 29 09:02:48 2020
NOTE: client testdb1:testdb:rac-scan mounted group 4 (TESTDG)
Wed Jul 29 09:02:49 2020
NOTE: Advanced to new COD format for group TESTDG


  • From the output of the crsd.trc file it can be seen that there’s a hard dependency between diskgroup and the database:


2020-07-29 09:02:50.015412 :UiServer:204928768: {1:32997:407} Container [ Name: UI_REGISTER
                API_HDR_VER:
                TextMessage[3]
                API_REGUPDATE_TAG:
                TextMessage[1]
                ASYNC_TAG:
                TextMessage[1]
                ATTR_LIST:
TextMessage[MANAGEMENT_POLICY=AUTOMATICSTART_DEPENDENCIES=+hard(ora.TESTDG.dg)+pullup(ora.TESTDG.dg)STOP_DEPENDENCIES=+hard(shutdown:ora.TESTDG.dg)]
                CLIENT:
                TextMessage[]
                CLIENT_NAME:
                TextMessage[Unknown process]
                CLIENT_PID:
                TextMessage[8543]
                CLIENT_PRIMARY_GROUP:
                TextMessage[oinstall]
                LOCALE:
                TextMessage[AMERICAN_AMERICA.AL32UTF8]
                NO_WAIT_TAG:
                TextMessage[1]
                QUEUE_TAG:
                TextMessage[1]
                RESOURCE:
                TextMessage[ora.testdb.db]
                UPDATE_TAG:
                TextMessage[1]
]


– Now to see the new list of diskgroups which are part of the database configuration, we run the following command:

-bash-4.1$ srvctl config database -d testdb | grep Disk
Disk Groups: DATA,CFILE2,TESTDG
-bash-4.1$

As you see, diskgroup +TESTDG is also part of the database configuration. Next, to imitate a storage failure, or disk crash, I corrupt the disk of the diskgroup +TESTDG using dd command as follows:


-bash-4.1$ dd if=/dev/zero of=/dev/asm-disk5 bs=1024 count=10000
10000+0 records in
10000+0 records out
10240000 bytes (10 MB) copied, 0.125557 s, 81.6 MB/s
-bash-4.1$

– And check the alert.log file. Once it’s detected that the disk of the diskgroup with external redundancy is corrupted, database instance will crash:


Wed Jul 29 09:19:45 2020
USER (ospid: 27939): terminating the instance
Wed Jul 29 09:19:47 2020
Instance terminated by USER, pid = 27939


  • And from the alert.log file of an ASM instance, it can be seen that the disk is offlined:


Wed Jul 29 09:19:49 2020
NOTE: SMON did instance recovery for group DATA domain 3
NOTE: SMON detected lock domain 4 invalid at system inc 6 07/29/20 09:19:49
NOTE: SMON starting instance recovery of group TESTDG domain 4 inc 6 (mounted) at 07/29/20 09:19:49
NOTE: SMON will attempt offline of disk 0 - no header
NOTE: cache initiating offline of disk 0 group TESTDG
NOTE: process _smon_+asm1 (5245) initiating offline of disk 0.3916011317 (TESTDG_0000) with mask 0x7e in group 4 (TESTDG) with client assisting
NOTE: initiating PST update: grp 4 (TESTDG), dsk = 0/0xe9699735, mask = 0x6a, op = clear
Wed Jul 29 09:19:49 2020
GMON updating disk modes for group 4 at 14 for pid 18, osid 5245
ERROR: disk 0(TESTDG_0000) in group 4(TESTDG) cannot be offlined because the disk group has external redundancy.
Wed Jul 29 09:19:49 2020
ERROR: too many offline disks in PST (grp 4)


  • Now, we try to start the database


-bash-4.1$ srvctl start database -d testdb
PRCR-1079 : Failed to start resource ora.testdb.db
CRS-5017: The resource action "ora.testdb.db start" encountered the following error:
ORA-01157: cannot identify/lock data file 2 - see DBWR trace file
ORA-01110: data file 2: '+TESTDG/TESTDB/DATAFILE/mytbs.256.1047027769'
. For details refer to "(:CLSN00107:)" in "/u01/app/oracle/diag/crs/node1/crs/trace/crsd_oraagent_oracle.trc".


It will fail. Because it can’t access the datafile which is in the failed diskgroup. Here’s the output of the trace file:


CRS-2674: Start of 'ora.testdb.db' on 'node1' failed
CRS-2632: There are no more servers to try to place resource 'ora.testdb.db' on that would satisfy its placement policy
CRS-5017: The resource action "ora.testdb.db start" encountered the following error:
ORA-01157: cannot identify/lock data file 2 - see DBWR trace file
ORA-01110: data file 2: '+TESTDG/TESTDB/DATAFILE/mytbs.256.1047027769'
. For details refer to "(:CLSN00107:)" in "/u01/app/oracle/diag/crs/node2/crs/trace/crsd_oraagent_oracle.trc".
CRS-2674: Start of 'ora.testdb.db' on 'node2' failed


  • Output of alert.log file:


Wed Jul 29 09:22:15 2020
Errors in file /u01/app/oracle/diag/rdbms/testdb/testdb1/trace/testdb1_ora_28674.trc:
ORA-01157: cannot identify/lock data file 2 - see DBWR trace file
ORA-01110: data file 2: '+TESTDG/TESTDB/DATAFILE/mytbs.256.1047027769'
ORA-1157 signalled during: ALTER DATABASE OPEN /* db agent *//* {1:32997:676} */...
Wed Jul 29 09:22:17 2020
License high water mark = 1
Wed Jul 29 09:22:17 2020
USER (ospid: 28854): terminating the instance
Wed Jul 29 09:22:18 2020
Instance terminated by USER, pid = 28854


  • Next, we offline the datafile and restart the database:


SQL> alter database datafile 2 offline;
Database altered.
SQL>


-bash-4.1$ srvctl stop database -d testdb -stopoption abort
-bash-4.1$ srvctl start database -d testdb


Database is UP! Great! But …..  We solved the physical file dependency problem which was preventing database to start. But we still have the failed diskgroup in the configuration of the database resource:


-bash-4.1$ srvctl config database -d testdb | grep Disk
Disk Groups: DATA,CFILE2,TESTDG
-bash-4.1$


It means that once we restart the clusterware stack, the database resource will NOT start, because it has hard dependency with the diskgroup which is part of its configuration, which is FAILED …

Let’s restart the crs and check the status of the database:


-bash-4.1# crsctl stop crs
-bash-4.1# crsctl start crs


  • From the output of the ASM alert.log file, it can be seen that ASM tried to mount the diskgroup and failed:


Wed Jul 29 09:41:09 2020
ERROR: ALTER DISKGROUP TESTDG MOUNT  /* asm agent *//* {1:42096:2} */
Wed Jul 29 09:41:09 2020

WARNING: Disk Group DATA containing voting files is not mounted
ORA-15032: not all alterations performed
ORA-15017: diskgroup "TESTDG" cannot be mounted
ORA-15040: diskgroup is incomplete
ORA-15017: diskgroup "DATA" cannot be mounted
ORA-15013: diskgroup "DATA" is already mounted


  • CRS is up
[root@node1 oracle]# crsctl check crs
CRS-4638: Oracle High Availability Services is online
CRS-4537: Cluster Ready Services is online
CRS-4529: Cluster Synchronization Services is online
CRS-4533: Event Manager is online
[root@node1 oracle]#


  • As we restarted crs in the first node, the instance is not running in the first node, and still up in the second node which will be down upon the next crs or node restart.


[root@node1 oracle]# srvctl status database -d testdb
Instance testdb1 is not running on node node1
Instance testdb2 is running on node node2
[root@node1 oracle]#


  • If we try to restart the instance in the first node, we’ll fail:


-bash-4.1$ srvctl start instance -d testdb -i testdb1
PRCR-1013 : Failed to start resource ora.testdb.db
PRCR-1064 : Failed to start resource ora.testdb.db on node node1
CRS-2674: Start of 'ora.TESTDG.dg' on 'node1' failed
-bash-4.1$


A message appered in asm trace file once you try to start the instance


Wed Jul 29 09:44:28 2020
ERROR: ALTER DISKGROUP ALL MOUNT FOR testdb /* asm agent *//* {1:42096:192} *//* incarnation::1*/


It’s scary! You have a failed diskgroup which doesn’t contain ANY physical file in it, and it will stop you to start the database instance because the database resource is dependent on it. The only way is to modify the database resource configuration and remove the diskgroup as follows:


-bash-4.1$ srvctl modify database -d testdb -diskgroup DATA,CFILE2

  • Now if we check the crsd.log file, we can see that we have only two diskgroups : + DATA and CFILE2 with hard dependency


2020-07-29 09:46:09.329870 :UiServer:2822174464: {1:42096:285} Container [ Name: UI_REGISTER
                API_HDR_VER:
                TextMessage[3]
                API_REGUPDATE_TAG:
                TextMessage[1]
                ATTR_LIST:
                TextMessage[START_DEPENDENCIES=hard(ora.DATA.dg,ora.CFILE2.dg) weak(type:ora.listener.type,global:type:ora.scan_listener.type,uniform:ora.ons,global:ora.gns) pullup(ora.DATA.dg,ora.CFILE2.dg)STOP_DEPENDENCIES=hard(intermediate:ora.asm,shutdown:ora.DATA.dg,shutdown:ora.CFILE2.dg)]
                CLIENT:
                TextMessage[]
                CLIENT_NAME:
                TextMessage[/usr/bin/java]
                CLIENT_PID:
                TextMessage[13981]
                CLIENT_PRIMARY_GROUP:
                TextMessage[oinstall]
                LOCALE:
                TextMessage[AMERICAN_AMERICA.US7ASCII]
                QUEUE_TAG:
                TextMessage[1]
                RESOURCE:
                TextMessage[ora.testdb.db]
                UPDATE_TAG:
                TextMessage[1]
]


To make sure it’s successfully modified, run the following command and check the output:


-bash-4.1$ srvctl config database -d testdb | grep Disk
Disk Groups: DATA,CFILE2


– Now we should be able to start the instance:

-bash-4.1$ srvctl start instance -d testdb -i testdb1
-bash-4.1$


  • Output of the alert.log file
Wed Jul 29 09:47:30 2020
AQPC started with pid=55, OS id=14549
Starting background process CJQ0
Completed: ALTER DATABASE OPEN /* db agent *//* {1:42096:364} */


What I faced that night, was that the diskgroup was successfully dropped from ASMCA, but in the crsd.log file the hard dependency was not removed from the clusterware configuration, and I decided to not restart the crs, thinking it will not startup because of this dependency. Diskgroup was already empty containing no physical datafiles, dismounted and dropped successfully but it’s hard dependency from the database resource was not changed, probably because of a bug. Which means that after dropping the diskgroup if we tried to reboot both nodes or crs, the database wouldn’t start and would lead the downtime.

Lessons learned:

  • Make sure to check alert.log file of database and asm instance, and cluster log and trace files once you perform any change (even dropping a diskgroup in the production environment and even if it succeeded)
  • After making a cluster level change, make sure to restart the crs or even perform a node reboot to see everything is ok after the change.
  • Don’t stop the entire database. Restart the crs or db instances in rolling fashion. Make sure you have at least once instance available every time.


Viewing all 60 articles
Browse latest View live